每天推薦一個 GitHub 優質開源項目和一篇精選英文科技或編程文章原文,歡迎關注開源日報。交流QQ群:202790710;微博:https://weibo.com/openingsource;電報群 https://t.me/OpeningSourceOrg

今日推薦開源項目:《時間分析器 py-spy》傳送門:GitHub鏈接
推薦理由:這玩意可以讓你不需要給你的 Python 程序做些手腳就能夠分析出在程序中哪些部分最花時間,即使這個程序正在運行。每個部分消耗的時間和來源都會顯示在命令行界面中,所以如果你發現某個地方特別慢,只需要看看是哪個函數出了問題然後順藤摸瓜改過去就行了。如果你想要把這個記錄下來,它也能給你生成一個 Flame Graph 用於保存記錄。
Flame Graph:Flame graphs are a visualization of profiled software, allowing the most frequent code-paths to be identified quickly and accurately. They can be generated using my open source programs on github.com/brendangregg/FlameGraph, which create interactive SVGs. See the Updates section for other implementations. Recently I've been helping with d3-flame-graph.
今日推薦英文原文:《All You need to know about Git P1.》作者:David Hany
原文鏈接:https://medium.com/@Galoomba/all-you-need-to-know-about-git-p-1-ac2f29e8ee93
推薦理由:Git 是一個版本控制系統,這篇文章介紹了在 Git 中你要了解的地方,推薦剛剛接觸 Git 的新手一讀
All You need to know about Git P1.
What is Git!

Git is a version control system. For example, if you have a file on which you』ve been working and reworking for a long time, all it』s versions are saved in Git, and you can easily get back to any version.
Are there any other version control systems like Git ?
Yes, There are many others like Mercurial, Apache Subversion (SVN) and Concurrent Versions System (CVS), But we will only talk about Git in this article.
Why Git ?!
There are many advantages to use Git with your project,Some of which are detailed in this link→https://www.git-tower.com/learn/git/ebook/en/command-line/appendix/why-git
Now that we became sure about using Git, There are 2 keystones we have to know about before starting
1-What is a repository?
2-What is a commit?
→What is a repository !
Let』s say we have a recipe for the tastiest burger, but the Chef thinks he can improve it. So he starts to pick apart his recipe and changing some of the ingredients. When he tried his new and improved burger, it wasn』t that good and he no longer remembered the old recipe.
This scenario was going to have a better ending if the Chef was familiar with Git. In another world with Git he could easily return to his old savoury recipe rather than the new terrible one in just a few steps.
In information technology, a repository is a central place in which an aggregation of data is kept and maintained in an organized way, There are two scenarios for creating a repository and that will lead to the first two commands you should be familiar with.
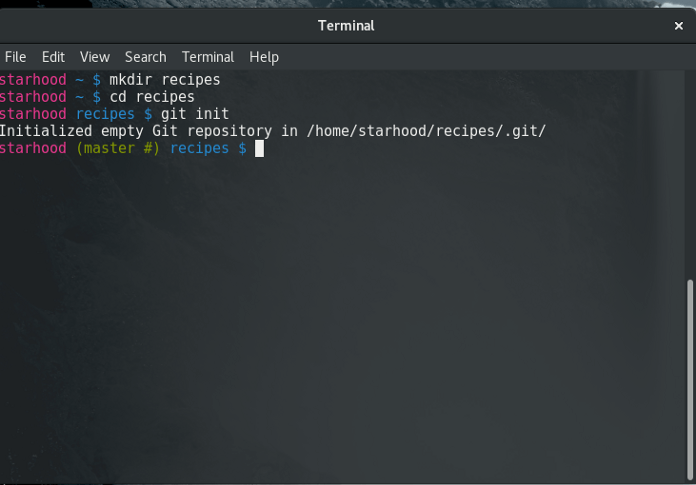
Making a Local repository
After installing Git, It』s the time to start helping the chef make his first repo to save his recipes, To make a new repo all you have to do is to open your terminal, make a new directory and type the command git init.
Now we have our repository, But it』s all empty and it』s the time to add some recipes to it.
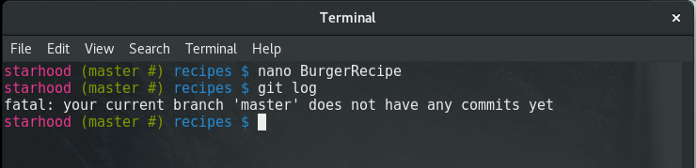
Let』s start by creating a new text file which will contain our beloved burger recipe (For vegans you can consider it a vegan burger if that will cheer you up). I』m using nano as my text editor but you can use the text editor you prefer
After making the new text file and adding your recipe ingredients, You are ready to try the Second command which is git log to see if any changes occurred to your repo, And don』t be shocked if you find a message like this
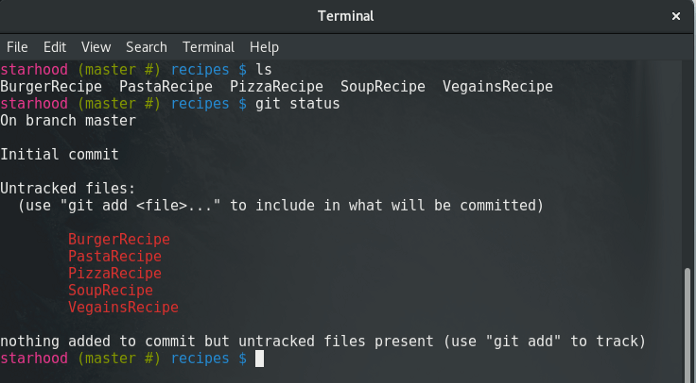
We could debug using the command git status

It looks like our file is untraceable, which sets us up to discuss one of the core concepts of Git
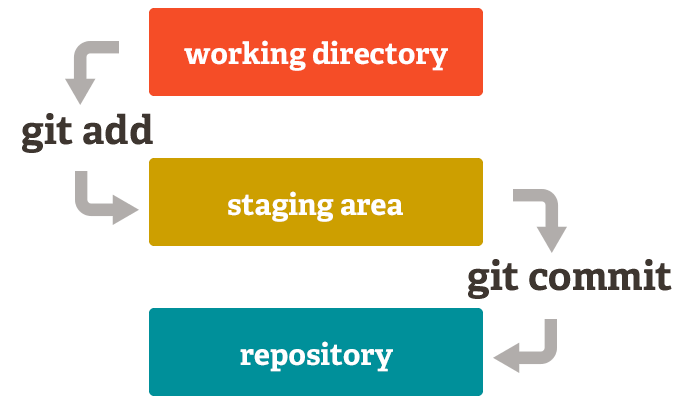
Staging is a step before the commit process in Git. let』s back to our chef. Do you think that he only has that single recipe!
In most of the cases there will be more than one recipe he will have pasta, pizza, soup, and some vegan recipes
In that case which of those recipes should be committed ?!
That』s where the staging area plays. We have to add the files we want to commit to the the staging area first. And that where we get introduced to a new command where is git add.
There are 2 ways to use this command the first is to use it like git add <file_name>to add specific files to the staging area. The second git add . which adds all the files to the staging area, In our case we will use it to add only 2 recipes for the moment, The Burger recipe and the Pizza recipe

All seems to works fine, So let』s try git status again to see if there is any change

Woohaa!, both of the files are now on the staging area and ready to be committed, Here is where the next command introduces itself, git commit and you can always use it this way git commit -m "<descriptive but short message about my commit>"

Now we can check our commits by using command git log to check the commits history
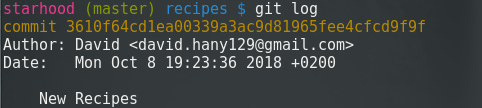
The hash above is the commit id you can refer to by the first 4 digits. each commit has a specific id you could return to any time you need, But we will delay that to the next article .
Until now we』ve been creating a Git Repo, Adding files to it, chose which files we will need to commit and do our first commit, Next article we will make other commits learning how to move between them and getting familiar with Branches
→Today's Commands
git init Create an empty Git repository or reinitialize an existing one
git log Show commit logs
git status Show the working tree status
git add Add file contents to the index 「Staging Area」
git commit Record changes to the repository
每天推薦一個 GitHub 優質開源項目和一篇精選英文科技或編程文章原文,歡迎關注開源日報。交流QQ群:202790710;微博:https://weibo.com/openingsource;電報群 https://t.me/OpeningSourceOrg

啊對了,剛才只記得好評了,都忘記了:有的圖有一點小誒,如果放圖的時候能稍微調大一點就更好了呢!~
哇這篇文極其好評,以菜譜為例講得很有趣耶!甚至完全沒有起念看一下旁邊進度條 😛