每天推薦一個 GitHub 優質開源項目和一篇精選英文科技或編程文章原文,歡迎關注開源日報。交流QQ群:202790710;微博:https://weibo.com/openingsource;電報群 https://t.me/OpeningSourceOrg

今日推薦開源項目:《Python 二連 Python Spider》GitHub鏈接
推薦理由:還在擔心學不會 Python 的爬蟲?沒關係,Python 二連幫你解決這個問題。這個項目是作者的爬蟲實戰項目集合,從普通的獲取信息的爬蟲到能夠解決驗證碼的爬蟲實例都有,相信有一定基礎的同學可以在其中學到不少爬蟲的知識。
今日推薦英文原文:《A Beginner』s Guide to React》作者:Betsy Sallee
原文鏈接:https://blog.usejournal.com/a-beginners-guide-to-react-36b19943d58f
推薦理由:給 React 初學者的指南,介紹了組件,JSX,狀態等等這些方面
A Beginner』s Guide to React
So, you』ve decided to learn React.js. Congratulations! This guide is intended to help you in your quest to understand four fundamental aspects of this incredibly powerful library. We will be building a very simple React app along the way that allows a user to enter a search term and retrieve a list of photographs that match this term from the Unsplash API. Let』s dive in.
Components
Components are the building blocks of every React application. A component can be used on its own, or it can be combined with other components to create even larger components. Crucially, components are dynamic: they provide a template, which will be filled in with variable data. The central purpose of a React component is to produce some JSX from this 「template」 (more on JSX soon), which will be translated into HTML and rendered on the DOM.
There are two types of React components: functional components and class-based components. A functional component is the simpler of the two: it is not aware of its state (don』t worry, I』ll explain 「state」 soon), and it simply receives information and turns it into JSX. You can also think of functional components as 「presentational components,」 as they are primarily concerned with altering the UI.
Class-based components, on the other hand, need to be aware of what the user is doing. For example, if a user clicks or types on the page, the component needs to be able to respond in some way. In simplest terms, a class-based component needs to be aware of state.
Class-based components have several lifecycle methods that fire at different points during instantiation and rendering, including constructor, render, and componentDidMount. The sole requirement of a class-based component is a render method, as this is the method in which the component returns JSX. Nevertheless, the component』s state is typically set in the constructor method, which is called on instantiation, so it would defeat the purpose of using a class-based component if you were to omit the constructor method. Because all class-based components extend React』s Component class, you must also call super inside the constructor method. Finally, if you plan to fetch data for use in your application, this must be done inside of componentDidMount, which fires after render.
Our photo searching application will have four components: the App component, which will hold our other components, the SearchBar component, the PhotoList component, and the PhotoListItem component. The JSX that the PhotoList and PhotoListItem components will render will be dependent on the data that is fetched from the Unsplash API, which in turn will be dependent on the term the user enters into SearchBar. As such, our App component, because it is the container, will be the component responsible for keeping track of that search term and fetching the data. This means that App will be a class-based component, and the other components will be functional.
JSX
I mentioned above that the most important responsibility of components is to generate some JSX based on a template, which will then be translated into HTML. But what is JSX?
According to the React Docs, JSX is 「a syntax extension to JavaScript.」 It looks extremely similar to HTML, but with some key differences. For example, you can include a vanilla JavaScript expression inside of your JSX by wrapping it in curly braces:
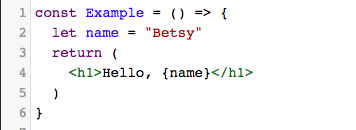
Additionally, HTML elements might have a 「class」, but elements in JSX have a 「className.」 They mean the same thing, and CSS will respond to a className in the same way it would a class in HTML. This distinction is made because 「class」 is a reserved word in ES6, and as JSX is actually JavaScript, it cannot reuse this word.
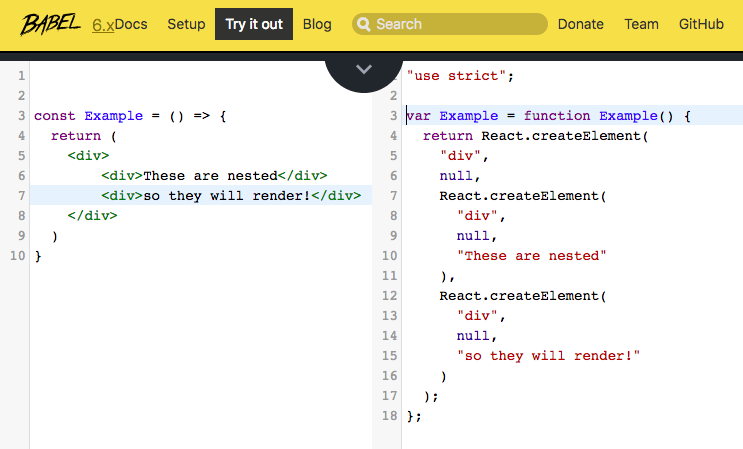
Even though JSX looks extremely similar to HTML, it must be transpiled into vanilla JavaScript by Babel in order for the browser to be able to interpret it. For example, when Babel sees the below JSX:
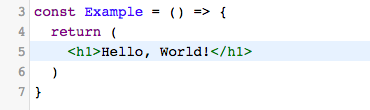
…it turns it into the below function, which returns the result of React.createElement(). React.createElement() takes two arguments: the tag name of the element being created, and the content inside the tag.
It』s not essential that you write JSX in your React components; instead, you could write React.createElement() over and over again, and your code wouldn』t have to be transpiled. But as programmers, we like to be concise, and writing this sort of vanilla JavaScript inside your components will get messy quickly, especially when you have JSX tags nested inside one another.
There is, however, one caveat to using JSX. Check out what happens if we try to get our component to render two sibling JSX elements:
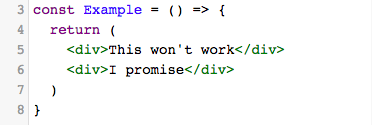
This error arises because, when Babel transpiles a JSX tag, it turns it into a function that returns the result of React.createElement(). Because the 「return」 keyword is essentially a break point — that is, a point at which at the code stops running — it』s not possible to have two 「return」 statements inside of a component. So, in order to render sibling elements, they must be nested inside of a parent div, like so:
A good rule of thumb for JSX: when in doubt, render everything inside of a single div.
State
State is perhaps the most confusing React concept, but it』s essential for you to understand it in order to imbue your projects with all of React』s magic. In the simplest of terms, state is a JavaScript object that records and reacts to user events. Every class-based component has its own state object, and whenever a component』s state is altered, the component, along with all of its children, re-renders.
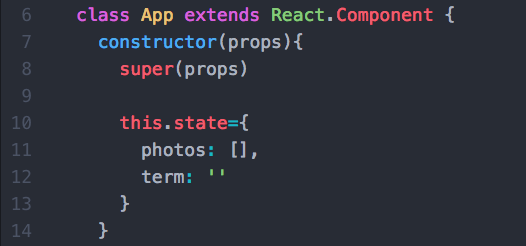
Initial state can only be set in the component』s constructor method, which is called on instantiation. Because our App component is class-based, we will follow that rule:
This is the only time you should ever set this.state equal to an object. For instance, if a user interacts with the component and you need to update it to reflect their action, you must use a different syntax:
this.setState({ term: 'sunsets'})
One of the trickiest parts of mastering state is deciding which components in your application should have state. In order to do so, first assess which of your components depend on the data that is going to change over time. The component that has state should be the parent of all of these components, because these children components will have access to the changing data through their props object.
But what, you ask, is a props object?
Props
I mentioned earlier that whenever a component』s state changes, that component and all of its children re-render. Why is it necessary for a component』s children to re-render when the parent component』s state changes? Enter: props.
Props is an object given to a component by its parent, and it contains all of the information relevant to that particular component. If state is like the source of a waterfall, props is the water that flows downwards.
Remember how we said that App is the class-based parent component of SearchBar and PhotoList? App is responsible for both fetching data from our Unsplash API and keeping track of the search term that we will use for that fetch. It then passes that data and any relevant methods down to SearchBar and PhotoList, and eventually to PhotoListItem, via props. The App component looks like this:
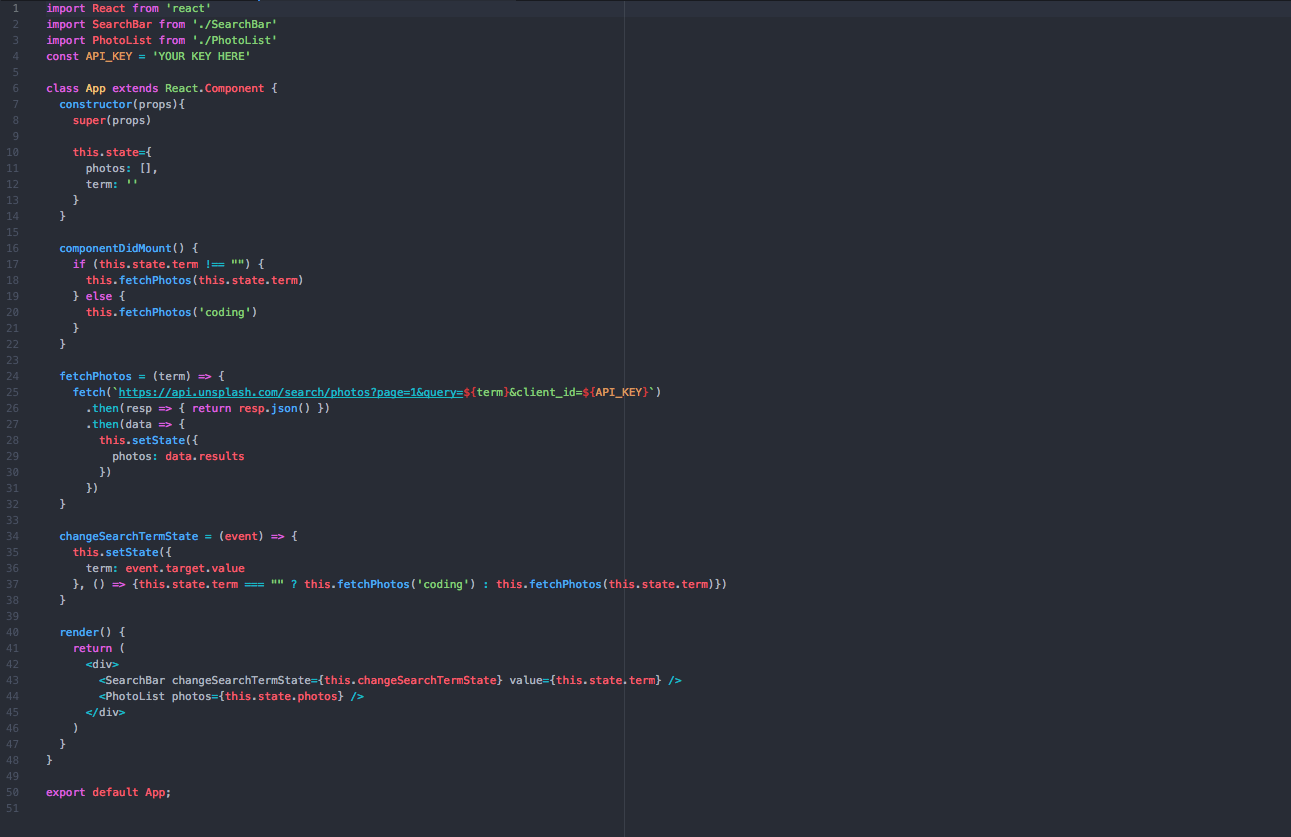
Let』s break this down. When the App component renders for the first time, its componentDidMount method runs. Because the user hasn』t yet typed anything into the search bar, the 「term」 key in state is empty. As such, the component fetches photos from the API matching the default term 「coding.」 It then sets the returned data to the 「photos」 key inside of its state and re-renders. In the process of re-rendering, it passes a) the changeSearchTermState method and the 「term」 itself down to SearchBar as props and b) the 「photos」 array down to PhotoList as props.
Now, let』s take a look at SearchBar:
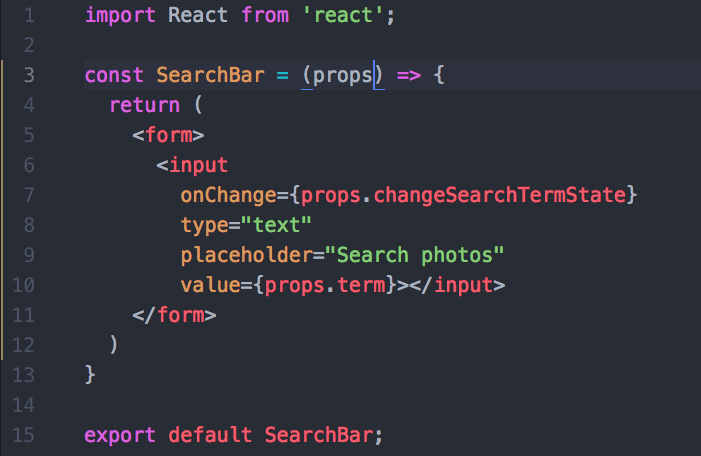
We』ve declared the SearchBar component as a const variable, rather than a class, which means it is a purely functional component. This might seem counterintuitive, since SearchBar needs to keep track of user events. But because all of our other components, including App, depend on whatever the user types into SearchBar, we lift its state up to App (with the 「term」 key inside of App』s state). We can then change the value of 「term」 inside of App』s state with the changeSearchTermState callback inside of SearchBar』s props. Every time the user types into the input field, App』s changeSearchTermState method fires, re-setting the 「term」 inside of App』s state, thereby triggering a re-render, and finally, another call to the Unsplash API.
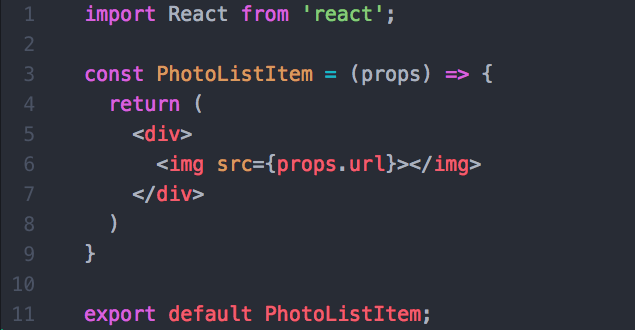
Now, let』s move on to PhotoList. As I mentioned, PhotoList receives the photos array inside of App』s state as props. But what does it do with that data? Let』s take a look:

The props object of this functional component contains all of the photos retrieved from the Unsplash API that match the user』s search term. It』s now time to iterate over the 「photos」 key inside of the props object, which points to an array of photos, and create an individual photoListItem out of each element in that array. And we』re even passing that PhotoListItem its own prop — a URL, which came all the way down from App』s state. All that』s left is for PhotoListItem to render its JSX to the DOM. Because each PhotoListItem has a URL inside of its props, we can set that URL as the src attribute of an img tag inside of a div, as such:
And now, our work is done! Thanks to the power of props, we』re able to see our images on the DOM in all their (unstyled) glory.

Conclusion
While this guide is far from comprehensive, it is intended to give you an introduction to what I consider to be the four central pillars of React. I』ve added this completed repo to GitHub, so feel free to clone it down and take a closer look. Just remember to get your own API key for Unsplash. I also highly recommend you check out the below resources.
Best of luck!
每天推薦一個 GitHub 優質開源項目和一篇精選英文科技或編程文章原文,歡迎關注開源日報。交流QQ群:202790710;微博:https://weibo.com/openingsource;電報群 https://t.me/OpeningSourceOrg
