每天推荐一个 GitHub 优质开源项目和一篇精选英文科技或编程文章原文,欢迎关注开源日报。交流QQ群:202790710;微博:https://weibo.com/openingsource;电报群 https://t.me/OpeningSourceOrg

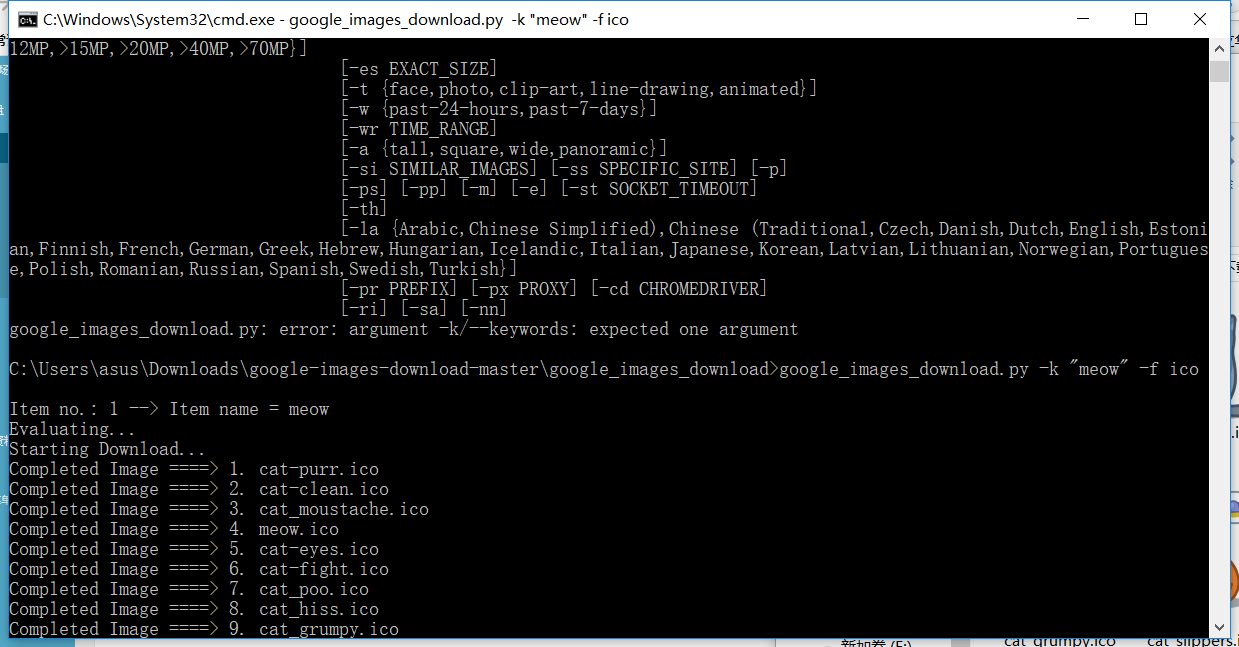
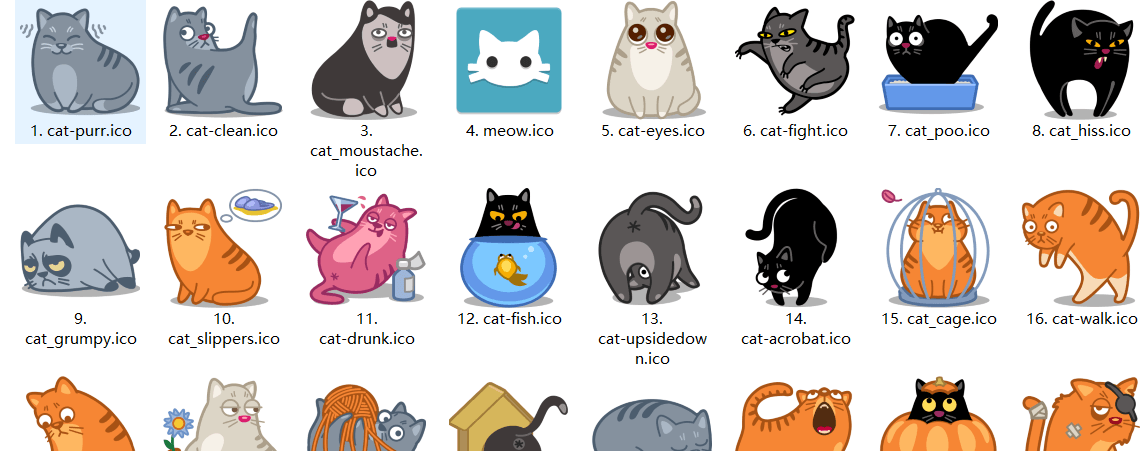
今日推荐开源项目:《简单方便找图片 Google Images Download》GitHub链接
推荐理由:这个项目可以让你在 Google 上简单的下载你想要的图片,当你需要一些种类的图片素材的时候很是适用,一般来说直接下载整个 zip 文件,然后运行 setup.py install ,再接着运行 google_images_download.py 然后组合你想要的命令即可。
今日推荐英文原文:《face-api.js — JavaScript API for Face Recognition in the Browser with tensorflow.js》作者:Vincent Mühler
推荐理由:这篇文章介绍了一个人脸识别的 JavaScript 库,兴许你已经在 GitHub 上看到过这个了
face-api.js — JavaScript API for Face Recognition in the Browser with tensorflow.js
I am excited to say, that it is finally possible to run face recognition in the browser! With this article I am introducing face-api.js, a javascript module, built on top of tensorflow.js core, which implements three types of CNNs (Convolutional Neural Networks) to solve face detection, face recognition and face landmark detection.
As always we will look into a simple code example, that will get you started immediately with the package in just a few lines of code. Let’s dive into it!
First face-recognition.js, now yet another package?
If you have read my other article about face recognition with nodejs: Node.js + face-recognition.js : Simple and Robust Face Recognition using Deep Learning, you may be aware that some time ago, I assembled a similar package, e.g. face-recognition.js, bringing face recognition to nodejs.
At first, I did not expect there being such a high demand for a face recognition package in the javascript community. For a lot of people face-recognition.js seems to be a decent free to use and open source alternative to paid services for face recognition, as provided by Microsoft or Amazon for example. But I also have been asked a lot, whether it is possible to run the full face recognition pipeline entirely in the browser.
Finally it is, thanks to tensorflow.js! I managed to implement partially similar tools using tfjs-core, which will get you almost the same results as face-recognition.js, but in the browser! And the best part about it is, there is no need to set up any external dependencies, it works straight out of the box. As a bonus it is GPU accelerated, running operations on WebGL.
This was reason enough to convince me, that the javascript community needs such a package for the browser! I’ll leave it up to your imagination, what variety of applications you can build with this. 😉
How to solve Face Recognition with Deep Learning
If you are that type of guy (or girl), who is looking to simply get started as quickly as possible, you can skip this section and jump straight into the code. But to get a better understanding about the approach used in face-api.js to implement face recognition, I would highly recommend you to follow along, since I get asked about this quite often.
To keep it simple, what we actually want to achieve, is to identify a person given an image of his / her face, e.g. the input image. The way we do that, is to provide one (or more) image(s) for each person we want to recognize, labeled with the persons name, e.g. the reference data. Now we compare the input image to the reference data and find the most similar reference image. If both images are similar enough we output the person’s name, otherwise we output ‘unknown’.
Sounds like a plan! However, two problems remain. Firstly, what if we have an image showing multiple persons and we want to recognize all of them? And secondly, we need to be able to obtain such kind of a similarity metric for two face images in order to compare them…
Face Detection
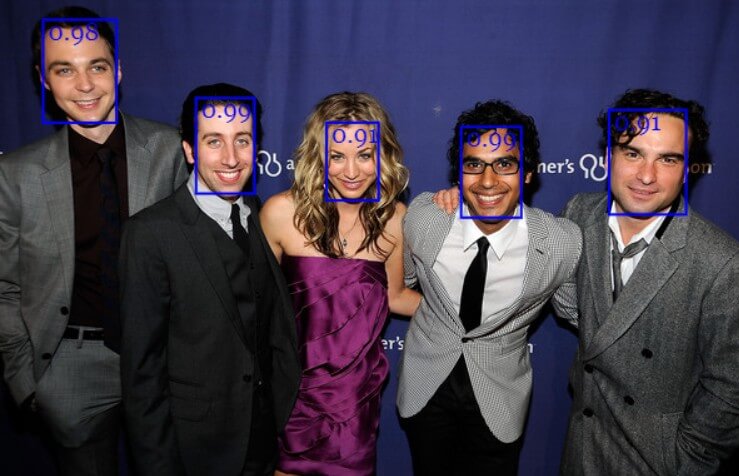
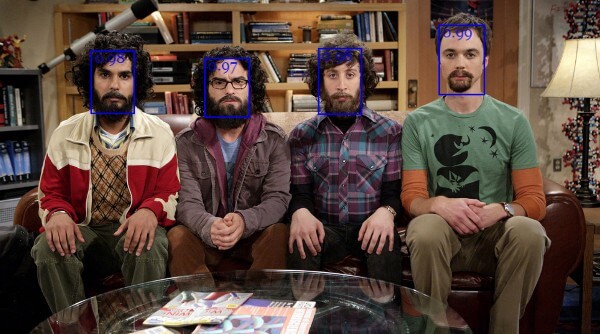
The answer to the first problem is face detection. Simply put, we will first locate all the faces in the input image. For face detection, face-api.js implements a SSD (Single Shot Multibox Detector), which is basically a CNN based on MobileNetV1, with some additional box prediction layers stacked on top of the network.
The network returns the bounding boxes of each face, with their corresponding scores, e.g. the probability of each bounding box showing a face. The scores are used to filter the bounding boxes, as it might be that an image does not contain any face at all. Note, that face detection should also be performed even if there is only one person in order to retrieve the bounding box.
Face Landmark Detection and Face Alignment
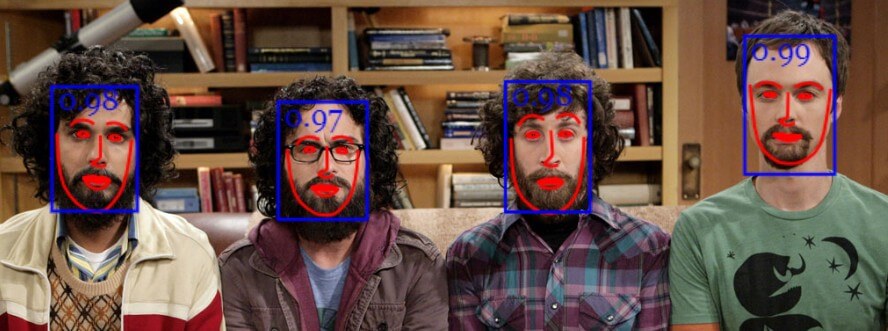
First problem solved! However, I want to point out that we want to align the bounding boxes, such that we can extract the images centered at the face for each box before passing them to the face recognition network, as this will make face recognition much more accurate!
For that purpose face-api.js implements a simple CNN, which returns the 68 point face landmarks of a given face image:

From the landmark positions, the bounding box can be centered on the face. In the following you can see the result of face detection (left) compared to the aligned face image (right):

Face Recognition
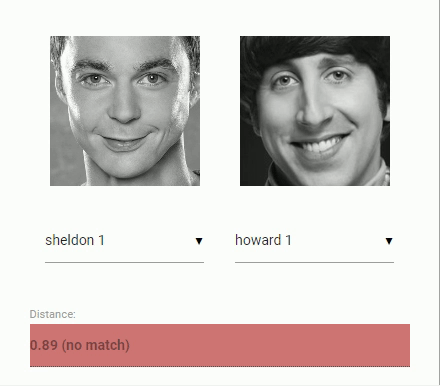
Now we can feed the extracted and aligned face images into the face recognition network, which is based on a ResNet-34 like architecture and basically corresponds to the architecture implemented in dlib. The network has been trained to learn to map the characteristics of a human face to a face descriptor (a feature vector with 128 values), which is also oftentimes referred to as face embeddings.
Now to come back to our original problem of comparing two faces: We will use the face descriptor of each extracted face image and compare them with the face descriptors of the reference data. More precisely, we can compute the euclidean distance between two face descriptors and judge whether two faces are similar based on a threshold value (for 150 x 150 sized face images 0.6 is a good threshold value). Using euclidean distance works surprisingly well, but of course you can use any kind of classifier of your choice. The following gif visualizes the comparison of two face images by euclidean distance:
And now that we ingested the theory of face recognition, we can start coding an example.
Coding time!
In this short example we will see step by step how to run face recognition on the following input image showing multiple persons:

Including the Script
First of all, get the latest build from dist/face-api.js or the minifed version from dist/face-api.min.js and include the script:
<script src="face-api.js"></script>
In case you work with npm:
npm i face-api.js
Loading the Model Data
Depending on the requirements of your application you can specifically load the models you need, but to run a full end to end example we will need to load the face detection, face landmark and face recognition model. The model files are available on the repo and can be found here.
The model weights have been quantized to reduce the model file size by 75% compared to the original model to allow your client to only load the minimum data required. Furthermore, the model weights are split into chunks of max 4 MB, to allow the browser to cache these files, such that they only have to be loaded once.
The model files can simply be provided as static assets in your web app or you can host them somewhere else and they can be loaded by specifying the route or url to the files. Let’s say you are providing them in a models directory along with your assets under public/models:
const MODEL_URL = '/models'

await faceapi.loadModels(MODEL_URL)
Or, if you only want to load specific models:
const MODEL_URL = '/models'

await faceapi.loadFaceDetectionModel(MODEL_URL)
await faceapi.loadFaceLandmarkModel(MODEL_URL)
await faceapi.loadFaceRecognitionModel(MODEL_URL)
Receive a full description for all Faces from an Input Image
The neural nets accept HTML image, canvas or video elements or tensors as inputs. To detect the face’s bounding boxes of an input with a score > minScore we simply say:
const minConfidence = 0.8
const fullFaceDescriptions = await faceapi.allFaces(input, minConfidence)
A full face description holds the detecton result (bounding box + score), the face landmarks as well as the computed descriptor. As you can see faceapi.allFaces does everything discussed in the previous section under the hood for us. However, you can also obtain the face locations and landmarks manually. There are several examples available on the github repo, if this is your goal.
Note, that the bounding boxes and landmark positions are relative to the original image / media size. In case the displayed image size does not correspond to the original image size you can simply resize them:
const resized = fullFaceDescriptions.map(fd => fd.forSize(width, height))
We can visualize the detection results by drawing the bounding boxes into a canvas:
fullFaceDescription.forEach((fd, i) => {
  faceapi.drawDetection(canvas, fd.detection, { withScore: true })
})
The face landmarks can be displayed as follows:
fullFaceDescription.forEach((fd, i) => {
  faceapi.drawLandmarks(canvas, fd.landmarks, { drawLines: true })
})
Usually, what I do for visualization, is to overlay an absolutely positioned canvas on top of the img element with the same width and height (see github examples for more info).
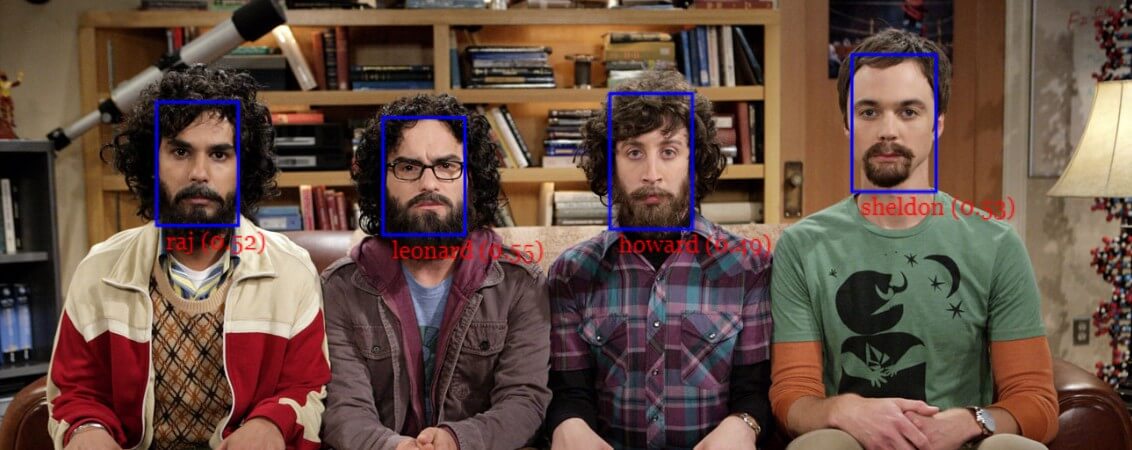
Face Recognition
Now that we know how to retrieve the locations and descriptors of all faces given an input image, we will get some images showing one person each and compute their face descriptors. These descriptors will be our reference data.
Assuming we have some example images for our subjects available, we first fetch the images from an url and create HTML image elements from their data buffers using faceapi.bufferToImage:
// fetch images from url as blobs
const blobs = await Promise.all(
  ['sheldon.png' 'raj.png', 'leonard.png', 'howard.png'].map(
    uri => (await fetch(uri)).blob()
  )
)

// convert blobs (buffers) to HTMLImage elements
const images = await Promise.all(blobs.map(
  blob => await faceapi.bufferToImage(blob)
))
Next, for each image we locate the subjects face and compute the face descriptor, just as we did previously with our input image:
const refDescriptions = await Promsie.all(images.map(
  img => (await faceapi.allFaces(img))[0]
))

const refDescriptors = refDescriptions.map(fd => fd.descriptor)
Now, everything that remains to be done is to loop through the face descriptions of our input image and find the descriptor with the lowest distance in our reference data:
const sortAsc = (a, b) => a - b
const labels = ['sheldon', 'raj', 'leonard', 'howard']

const results = fullFaceDescription.map((fd, i) => {
  const bestMatch = refDescriptors.map(
    refDesc => ({
      label: labels[i],
      distance: faceapi.euclideanDistance(fd.descriptor, refDesc)
    })
  ).sort(sortAsc)[0]

  return {
    detection: fd.detection,
    label: bestMatch.label,
    distance: bestMatch.distance
  }
})
As mentioned before, we use euclidean distance as a similarity metric here, which turns out to work pretty well. We end up with a best match for each face detected in our input image.
Finally we can draw the bounding boxes together with their labels into a canvas to display the results:
// 0.6 is a good distance threshold value to judge
// whether the descriptors match or not
const maxDistance = 0.6

results.forEach(result => {
  faceapi.drawDetection(canvas, result.detection, { withScore: false })

  const text = `${result.distance < maxDistance ? result.className : 'unkown'} (${result.distance})`
  const { x, y, height: boxHeight } = detection.getBox()
  faceapi.drawText(
    canvas.getContext('2d'),
    x,
    y + boxHeight,
    text
  )
})
There we go! By now, I hope you got a first idea how to use the api. Also I’d recommend to take a look at the other examples in the repo. And now, have fun playing around with the package! 😉
If you liked this article you are invited to leave some claps and follow me on medium and/or twitter :). Also feel free to leave a star on the github repository. Stay tuned for more tutorials!
每天推荐一个 GitHub 优质开源项目和一篇精选英文科技或编程文章原文,欢迎关注开源日报。交流QQ群:202790710;微博:https://weibo.com/openingsource;电报群 https://t.me/OpeningSourceOrg
