每天推薦一個 GitHub 優質開源項目和一篇精選英文科技或編程文章原文,歡迎關注開源日報。交流QQ群:202790710;微博:https://weibo.com/openingsource;電報群 https://t.me/OpeningSourceOrg

今日推薦開源項目:《從 Python 開始的機器學習 Machine learning basics 》GitHub鏈接
推薦理由:這個項目主要是介紹如何使用純 Python 實現基本的機器學習演算法,雖然這可能並不是最快的方法,但是可以讓讀者更好的理解演算法和它們的結構。推薦剛剛開始學習機器學習演算法的朋友們一讀。

今日推薦英文原文:《Build A Chat App With Sentiment Analysis Using Next.js》作者:Brandon Morelli
原文鏈接:https://codeburst.io/build-a-chat-app-with-sentiment-analysis-using-next-js-c43ebf3ea643
推薦理由:這篇文章製作一個簡單的實時聊天程序的教程,同時還加入了通過詞語進行情感分析的功能。雖然情感分析不算是太萬能,不過也當作一個Next.js的試手也成。
Build A Chat App With Sentiment Analysis Using Next.js
Realtime applications have been around for quite a long time as we can see in contexts such as multi-player games, realtime collaboration services, instant messaging services, realtime data analytics tools, to mention a few. As a result, several technologies have been developed over the years to tackle and simplify some of the most challenging aspects of building apps that are sensitive to changes in realtime.
In this tutorial, we』ll build a very simple realtime chat application with sentiments. With sentiment analysis, we will be able to detect the mood of a person based on the words they use in their chat messages.
Prerequisites
Before you begin, ensure that you have Node and npm or Yarn installed on your machine. Here is a run-down of the core technologies we will be using.
- Next.js — A framework for building server-side rendered(SSR) React applications with ease. It handles most of the challenges that come with building SSR React apps.
- Pusher — Pusher is a technology for building apps with varying realtime needs like push notifications and pub/sub messaging. It is the engine behind the realtime ability of our comments widget.
- Sentiment — Sentiment is a module that uses the AFINN-165 wordlist and Emoji Sentiment Ranking to perform sentiment analysis on arbitrary blocks of input text.
- React — A very popular JavaScript DOM rendering framework for building scalable web applications using a component-based architecture.
- A few other libraries will be used as we will see in a moment. Also ensure that you have Node installed on your machine.
Installing dependencies
Create a new directory for the application and run the following command to install the required dependencies for the app.
# Create a new directory
    mkdir realtime-chat-app

    # cd into the new directory
    cd realtime-chat-app

    # Initiate a new package and install app dependencies
    npm init -y

    npm install react react-dom next pusher pusher-js sentiment
    npm install express body-parser cors dotenv axios
Setting environment variables
Create a new application on your Pusher Dashboard to get your application credentials. Create a .env file in the root directory of your application and add your application credentials as follows.
PUSHER_APP_ID=YOUR_APP_ID
    PUSHER_APP_KEY=YOUR_APP_KEY
    PUSHER_APP_SECRET=YOUR_APP_SECRET
    PUSHER_APP_CLUSTER=YOUR_APP_CLUSTER
Ensure that you use the same variable names as specified in the above snippet. We will make reference to them at several points in our code.
Next create a Next.js configuration file named next.config.js in the root directory of your application with the following content:
/* next.config.js */

    const webpack = require('webpack');
    require('dotenv').config();

    module.exports = {
      webpack: config => {
        const env = Object.keys(process.env).reduce((acc, curr) => {
          acc[`process.env.${curr}`] = JSON.stringify(process.env[curr]);
          return acc;
        }, {});

        config.plugins.push(new webpack.DefinePlugin(env));

        return config;
      }
    };
Since Next.js uses Webpack in the background for module loading and bundling, we are simply configuring Webpack to be able to provide the environment variables we have defined and make them available to our React components by accessing the process.env object.
Getting started
Setting up the server
We will go ahead to set up a simple server using Next.js to wrap an Express application server. We will also load the necessary middlewares for the Express server and then we will configure Pusher using the credentials we added to our environment variables.
Create a server.js file in the root directory of your application and add the following code snippet to it to set up the server:
/* server.js */

    const cors = require('cors');
    const next = require('next');
    const Pusher = require('pusher');
    const express = require('express');
    const bodyParser = require('body-parser');
    const dotenv = require('dotenv').config();
    const Sentiment = require('sentiment');

    const dev = process.env.NODE_ENV !== 'production';
    const port = process.env.PORT || 3000;

    const app = next({ dev });
    const handler = app.getRequestHandler();
    const sentiment = new Sentiment();

    // Ensure that your pusher credentials are properly set in the .env file
    // Using the specified variables
    const pusher = new Pusher({
      appId: process.env.PUSHER_APP_ID,
      key: process.env.PUSHER_APP_KEY,
      secret: process.env.PUSHER_APP_SECRET,
      cluster: process.env.PUSHER_APP_CLUSTER,
      encrypted: true
    });

    app.prepare()
      .then(() => {

        const server = express();

        server.use(cors());
        server.use(bodyParser.json());
        server.use(bodyParser.urlencoded({ extended: true }));

        server.get('*', (req, res) => {
          return handler(req, res);
        });

        server.listen(port, err => {
          if (err) throw err;
          console.log(`> Ready on http://localhost:${port}`);
        });

      })
      .catch(ex => {
        console.error(ex.stack);
        process.exit(1);
      });
Modify npm scripts
Finally, we will modify the "scripts" section of the package.json file to look like the following snippet:
/* package.json */

    "scripts": {
      "dev": "node server.js",
      "build": "next build",
      "start": "NODE_ENV=production node server.js"
    }
We have gotten all we need to start building our app components. If you run the command npm run dev on your terminal now, it will start up the application server on port 3000 if it is available. However, nothing happens on the browser yet, because we have not built any index page component. Let』s start building the app components.
Building the index page
Next.js requires that you create the page components of your app in a pages directory. We will go ahead and create a pages directory in our app root directory and create a new index.js file inside it for the index page of our application.
Before we add content to the index page, we will build a Layout component that can be used in our app pages as a kind of template. Go ahead and create a components directory in your app root. Create a new Layout.js file inside the just created components directory with the following content:
/* components/Layout.js */

    import React, { Fragment } from 'react';
    import Head from 'next/head';

    const Layout = props => (
      <Fragment>
        <Head>
          <meta charSet="utf-8" />
          <meta name="viewport" content="width=device-width, initial-scale=1, shrink-to-fit=no" />
          <link rel="stylesheet" href="https://maxcdn.bootstrapcdn.com/bootstrap/4.0.0/css/bootstrap.min.css" integrity="sha384-Gn5384xqQ1aoWXA+058RXPxPg6fy4IWvTNh0E263XmFcJlSAwiGgFAW/dAiS6JXm" crossOrigin="anonymous" />
          <title>{props.pageTitle || 'Realtime Chat'}</title>
        </Head>
        {props.children}
      </Fragment>
    );

    export default Layout;
Here, we try not to do so much. We are simply using the next/head component to add meta information to the <head> of our pages. We have also added a link to the Bootstrap CDN file to add some default styling to our app. We are also setting the page title dynamically from props and rendering the page contents using {props.children}.
Now let』s go ahead and add content to the index.js file we created earlier:
/* pages/index.js */

    import React, { Component } from 'react';
    import Layout from '../components/Layout';

    class IndexPage extends Component {

      state = { user: null }

      handleKeyUp = evt => {
        if (evt.keyCode === 13) {
          const user =  evt.target.value;
          this.setState({ user });
        }
      }

      render() {
        const { user } = this.state;

        const nameInputStyles = {
          background: 'transparent',
          color: '#999',
          border: 0,
          borderBottom: '1px solid #666',
          borderRadius: 0,
          fontSize: '3rem',
          fontWeight: 500,
          boxShadow: 'none !important'
        };

        return (
          <Layout pageTitle="Realtime Chat">

            <main className="container-fluid position-absolute h-100 bg-dark">

              <div className="row position-absolute w-100 h-100">

                <section className="col-md-8 d-flex flex-row flex-wrap align-items-center align-content-center px-5">
                  <div className="px-5 mx-5">

                    <span className="d-block w-100 h1 text-light" style={{marginTop: -50}}>
                      {
                        user
                          ? (<span>
                              <span style={{color: '#999'}}>Hello!</span> {user}
                            </span>)
                          : `What is your name?`
                      }
                    </span>

                    { !user && <input type="text" className="form-control mt-3 px-3 py-2" onKeyUp={this.handleKeyUp} autoComplete="off" style={nameInputStyles} /> }

                  </div>
                </section>

                <section className="col-md-4 position-relative d-flex flex-wrap h-100 align-items-start align-content-between bg-white px-0"></section>

              </div>

            </main>

          </Layout>
        );
      }

    }

    export default () => (
      <IndexPage />
    );
We created a component IndexPage for the index page of our app. We initialized the state of the component with an empty name property. The name property is meant to contain the name of the currently active user.
We also added an input field to receive the name of the user, if no user is currently active. Once the input field is filled and the enter or return key is pressed, the name supplied is stored in state.
If we test the app on our browser now, we should see a screen that looks like the following screenshot:

Building the Chat component
We will go ahead and build the chat component. Create a new Chat.js file inside the components directory and add the following content:
/* components/Chat.js */

    import React, { Component, Fragment } from 'react';
    import axios from 'axios';
    import Pusher from 'pusher-js';

    class Chat extends Component {

      state = { chats: [] }

      componentDidMount() {

        this.pusher = new Pusher(process.env.PUSHER_APP_KEY, {
          cluster: process.env.PUSHER_APP_CLUSTER,
          encrypted: true
        });

        this.channel = this.pusher.subscribe('chat-room');

        this.channel.bind('new-message', ({ chat = null }) => {
          const { chats } = this.state;
          chat && chats.push(chat);
          this.setState({ chats });
        });

        this.pusher.connection.bind('connected', () => {
          axios.post('/messages')
            .then(response => {
              const chats = response.data.messages;
              this.setState({ chats });
            });
        });

      }

      componentWillUnmount() {
        this.pusher.disconnect();
      }

    }

    export default Chat;
Here is a simple break down of what we』ve done:
- We first initialized the state to contain an empty
chatsarray property. Thischatsproperty will be populated with chat messages as they keep coming. When the component mounts, we set up a Pusher connection andchannelsubscription inside thecomponentDidMount()lifecycle method. - You can see that we are subscribing to a Pusher channel called
chat-roomfor our chat application. We are then binding to thenew-messageevent on the channel, which is triggered when a new chat message comes in. Next, we simply populate the statechatsproperty by appending the new chat. - Also, on the
componentDidMount()method, we are binding to theconnectedevent on the Pusher client, when it is freshly connected, to fetch all the chat messages from history by making aPOST /messagesHTTP request using theaxioslibrary. Afterwards, we populate the statechatsproperty with the chat messages received in the response. - The
Chatcomponent is not completed yet. We still need to add arender()method. Let』s do that quickly. Add the following snippet to theChatcomponent class.
/* components/Chat.js */

    handleKeyUp = evt => {
      const value = evt.target.value;

      if (evt.keyCode === 13 && !evt.shiftKey) {
        const { activeUser: user } = this.props;
        const chat = { user, message: value, timestamp: +new Date };

        evt.target.value = '';
        axios.post('/message', chat);
      }
    }

    render() {
      return (this.props.activeUser && <Fragment>

        <div className="border-bottom border-gray w-100 d-flex align-items-center bg-white" style={{ height: 90 }}>
          <h2 className="text-dark mb-0 mx-4 px-2">{this.props.activeUser}</h2>
        </div>

        <div className="border-top border-gray w-100 px-4 d-flex align-items-center bg-light" style={{ minHeight: 90 }}>
          <textarea className="form-control px-3 py-2" onKeyUp={this.handleKeyUp} placeholder="Enter a chat message" style={{ resize: 'none' }}></textarea>
        </div>

      </Fragment> )
    }
As seen in the render() method, we require an activeUser prop to identify the currently active user. We also rendered a <textarea> element for entering a chat message. We added an onKeyUp event handler to the <textarea> to send the chat message when you press the enter or return button.
On the handleKeyUp() event handler, we construct a chat object containing the user sending the message (currently active user), the message itself, and then the timestamp for when the message was sent. We clean up the <textarea>and then make a POST /message HTTP request, passing the chat object we created as payload.
Let』s add the Chat component to our index page. First, add the following line to the import statements in the pages/index.js file.
/* pages/index.js */

    // other import statements here ...
    import Chat from '../components/Chat';
Next, locate the render() method of the IndexPage component. Render the Chat component in the empty <section>element. It should look like the following snippet:
/* pages/index.js */

    <section className="col-md-4 position-relative d-flex flex-wrap h-100 align-items-start align-content-between bg-white px-0">
      { user && <Chat activeUser={user} /> }
    </section>
You can reload the app now in your browser to see the changes.
Defining the messaging routes
For now, nothing really happens when you try to send a chat message. You don』t see any message or any chat history. This is because we have not implemented the two routes we are making requests to.
We will go ahead and create the /message and /messages routes. Modify the server.js file and add the following just before the call to server.listen() inside the then() callback function.
/* server.js */

    // server.get('*') is here ...

    const chatHistory = { messages: [] };

    server.post('/message', (req, res, next) => {
      const { user = null, message = '', timestamp = +new Date } = req.body;
      const sentimentScore = sentiment.analyze(message).score;

      const chat = { user, message, timestamp, sentiment: sentimentScore };

      chatHistory.messages.push(chat);
      pusher.trigger('chat-room', 'new-message', { chat });
    });

    server.post('/messages', (req, res, next) => {
      res.json({ ...chatHistory, status: 'success' });
    });

    // server.listen() is here ...
First, we created a kind of in-memory store for our chat history, to store chat messages in an array. This is useful for new clients that join the chat room to see previous messages. Whenever the Pusher client makes a POST request to the /messages endpoint on connection, it gets all the messages in the chat history in the returned response.
On the POST /message route, we are fetching the chat payload from req.body through the help of the body-parsermiddleware we added earlier. We then use the sentiment module to calculate the overall sentiment score of the chat message. Next, we reconstruct the chat object, adding the sentiment property containing the sentiment score.
Finally, we add the chat to the chat history messages, and then trigger a new-message event on the chat-room Pusher channel, passing the chat object in the event data. This does the real time magic.
We are just a few steps away from completing our chat application. If you load the app on your browser now and try sending a chat message, you don』t see any feedback yet. That』s not because our app is not working. It is working perfectly. It』s simply because we are not yet rendering the chat messages on the view. Let』s head on to that and finish this up.
Displaying the chat messages
Create a new ChatMessage.js file inside the components directory and add the following content to it.
/* components/ChatMessage.js */

    import React, { Component } from 'react';

    class ChatMessage extends Component {

      render() {
        const { position = 'left', message } = this.props;
        const isRight = position.toLowerCase() === 'right';

        const align = isRight ? 'text-right' : 'text-left';
        const justify = isRight ? 'justify-content-end' : 'justify-content-start';

        const messageBoxStyles = {
          maxWidth: '70%',
          flexGrow: 0
        };

        const messageStyles = {
          fontWeight: 500,
          lineHeight: 1.4,
          whiteSpace: 'pre-wrap'
        };

        return <div className={`w-100 my-1 d-flex ${justify}`}>
          <div className="bg-light rounded border border-gray p-2" style={messageBoxStyles}>
            <span className={`d-block text-secondary ${align}`} style={messageStyles}>
              {message}
            </span>
          </div>
        </div>
      }

    }

    export default ChatMessage;
The ChatMessage component is a very simple component requiring two props: message for the chat message and position for the positioning of the message - either right or left. This is useful for positioning the messages of the active user on one side and then the messages of other users on the other side as we would do in a moment.
Finally, we will modify the components/Chat.js file to render the chat messages from the state. Make the following changes to the Chat component.
First add the following constants before the class definition of the Chat component. Each constant is an array of the code points required for a particular sentiment emoji. Also ensure to import the ChatMessage component.
/* components/Chat.js */

    // Module imports here ...
    import ChatMessage from './ChatMessage';

    const SAD_EMOJI = [55357, 56864];
    const HAPPY_EMOJI = [55357, 56832];
    const NEUTRAL_EMOJI = [55357, 56848];

    // Chat component class here ...
Then, add the following snippet between the chat header <div> and the chat message box <div> we created earlier in the Chat component.
/* components/Chat.js */

    {/** CHAT HEADER HERE **/}

    <div className="px-4 pb-4 w-100 d-flex flex-row flex-wrap align-items-start align-content-start position-relative" style={{ height: 'calc(100% - 180px)', overflowY: 'scroll' }}>

      {this.state.chats.map((chat, index) => {

        const previous = Math.max(0, index - 1);
        const previousChat = this.state.chats[previous];
        const position = chat.user === this.props.activeUser ? "right" : "left";

        const isFirst = previous === index;
        const inSequence = chat.user === previousChat.user;
        const hasDelay = Math.ceil((chat.timestamp - previousChat.timestamp) / (1000 * 60)) > 1;

        const mood = chat.sentiment > 0 ? HAPPY_EMOJI : (chat.sentiment === 0 ? NEUTRAL_EMOJI : SAD_EMOJI);

        return (
          <Fragment key={index}>

            { (isFirst || !inSequence || hasDelay) && (
              <div className={`d-block w-100 font-weight-bold text-dark mt-4 pb-1 px-1 text-${position}`} style={{ fontSize: '0.9rem' }}>
                <span className="d-block" style={{ fontSize: '1.6rem' }}>
                  {String.fromCodePoint(...mood)}
                </span>
                <span>{chat.user || 'Anonymous'}</span>
              </div>
            ) }

            <ChatMessage message={chat.message} position={position} />

          </Fragment>
        );

      })}

    </div>

    {/** CHAT MESSAGE BOX HERE **/}
Let』s try to understand what this code snippet is doing. First, we are going through each chat object in the state chatsarray property. We check if the sender of the message is the same as the currently active user and use that to determine the position of the displayed chat message. As you can see, the active user's messages will appear on the right.
We also use the sentiment score in the chat object to set the mood of the user while typing the message to either happy, sad or neutral using the earlier defined constants.
We conditionally render the name of the user before the chat message based on one of the following conditions being met.
isFirst- the current chat message is the first in the list!inSequence- the current chat message directly follows a message from another userhasDelay- the current chat message has a delay of over1 minutefrom the previous message of the same user- Also notice how we are using the
[String.fromCodePoint()](https://developer.mozilla.org/en-US/docs/Web/JavaScript/Reference/Global_Objects/String/fromCodePoint)method added in ES6 to get the emoji from the code points we defined in our constants earlier.
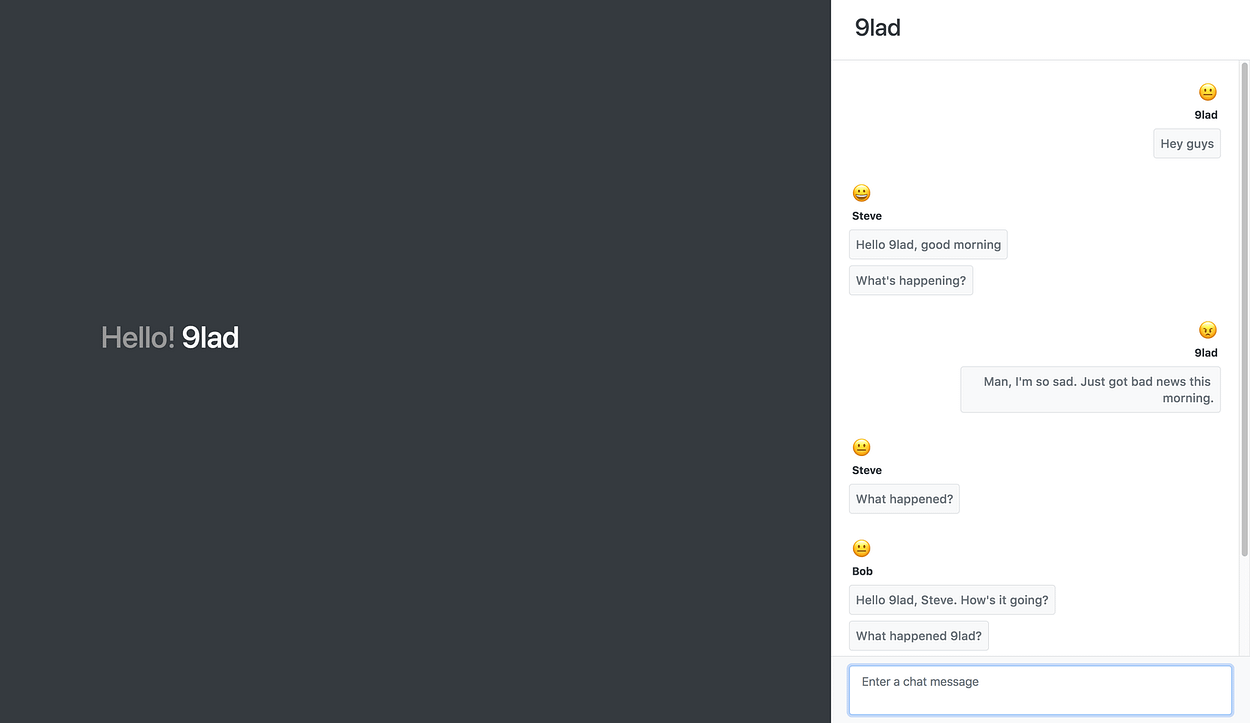
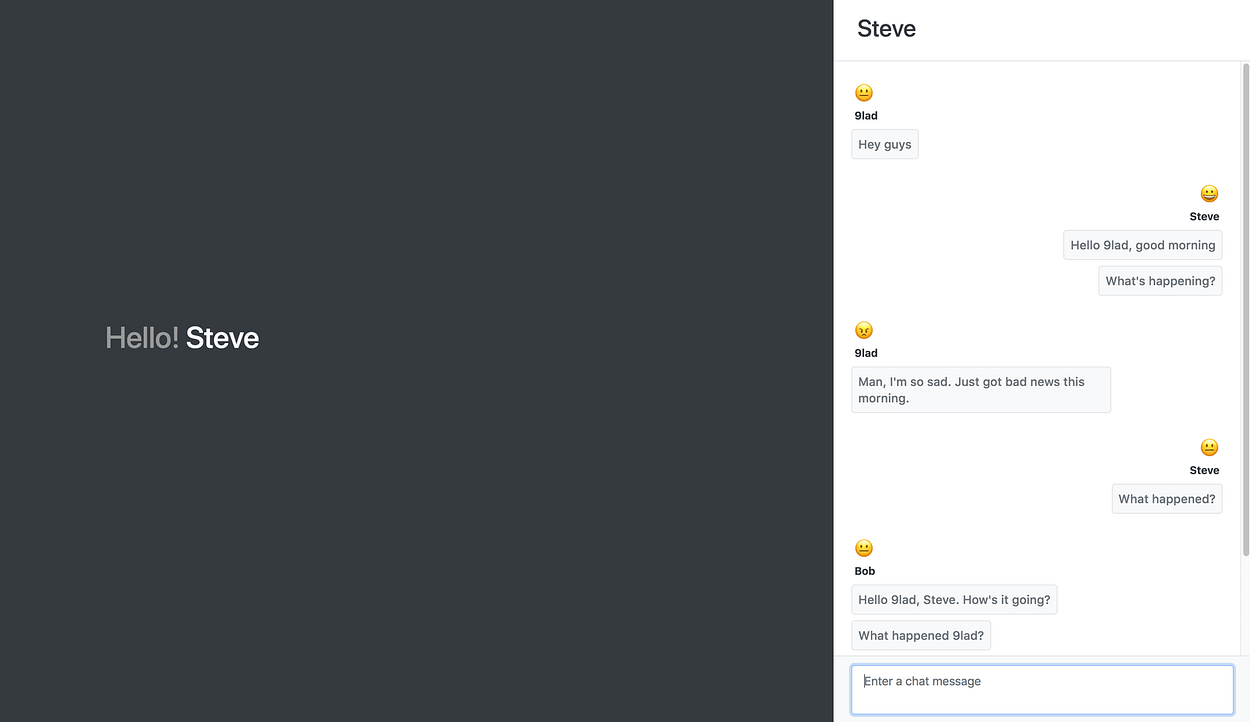
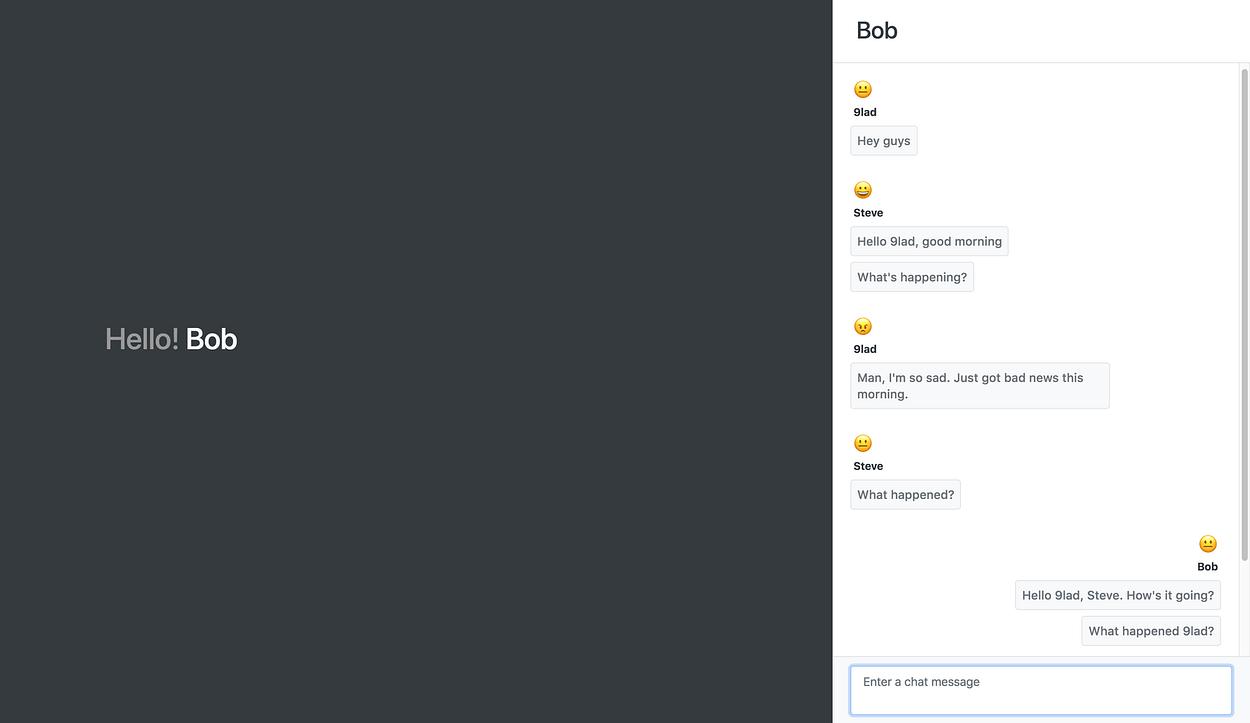
We are finally done with our chat app. You can go ahead to test what you have built on your browser. Here are some screenshots showing a chat between 9lad, Steve and Bob.
9lad

Steve

Bob

Conclusion
In this tutorial, we have been able to build a very simple chat application with chat sentiment using Next.js (React), Pusher and Sentiment Node module. While this tutorial focuses on just the basics, there are a lot of advanced stuffs you can do to make a better chat app. You can check the source code of this tutorial on GitHub.
Do check the documentation for each technology we used in this project to learn more about other ways of using them. I hope that this tutorial is helpful for you!
每天推薦一個 GitHub 優質開源項目和一篇精選英文科技或編程文章原文,歡迎關注開源日報。交流QQ群:202790710;微博:https://weibo.com/openingsource;電報群 https://t.me/OpeningSourceOrg

delivery failure
delivery failure
delivery failure
delivery failure