每天推荐一个 GitHub 优质开源项目和一篇精选英文科技或编程文章原文,欢迎关注开源日报。交流QQ群:202790710;电报群 https://t.me/OpeningSourceOrg
今日推荐开源项目:《Pell 一款超轻量级 web 文本编辑器》
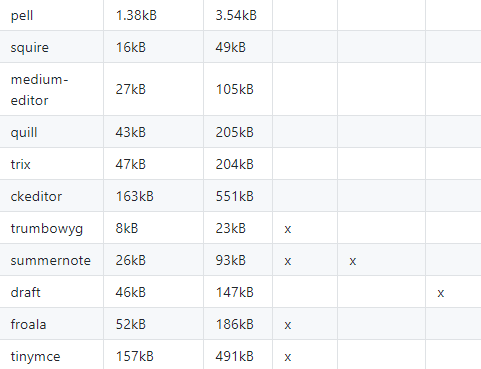
推荐理由:Pell 是一款超轻量级的 web 文本编辑器,提供文本编辑能力,包括加粗,加斜,下划线,列表,插入链接等。除此之外,它可高度自定义,整个编辑器的样式可方便地随意调节,编辑器的所有的图标和操作也都可以自定义。你完全可以通过简单地修改将其变成一个属于自己的编辑器。而 Pell 的 min 版本大小只有 3.54 kB , gizp 之后只有 1.38 kB,真可谓超轻量,并且不依赖任何框架和库。

github: https://github.com/jaredreich/pell
live demo: https://jaredreich.com/pell 试一试 pell 的惊艳表现吧。

原理和使用
实现一个编辑器可以先了解 domcument.execCommand: https://developer.mozilla.org/en-US/docs/Web/API/Document/execCommand 这个 API,Pell 使用了这个 API 对文本进行处理,因此也决定了 Pell 只支持 IE9+。
Pell 其实是实现了一个最基本的编辑器,可以说小巧够用,也可以说简陋。。。监听 ActionBar 的按钮点击然后执行 execCommand 相应的命令罢了。
Pell 可以通过修改其样式文件来修改编辑器的样式,默认的 sass 也就几行。ActionBar 上的按钮样式可以通过创建时自定义实现。一个小文本编辑器可以使用如下代码自定义创建。
//执行和初始化的方法
import { exec, init } from 'pell'

const editor = init({
  //绑定的 dom
  element: document.getElementById('pell'),
  //内容发生变化时触发
  onChange: html => {
    document.getElementById('html-output').textContent = html
  },
  //默认以 P 标签分隔
  defaultParagraphSeparator: 'p',
  styleWithCSS: true,
  //自定义顶部 ActionBar
  actions: [
    //表示使用默认
    'bold',
    'underline',
    //自定义
    {
      name: 'italic',
      result: () => exec('italic')
    },
    //自定义 icon 等
    {
      name: 'custom',
      icon: '<b><u><i>C</i></u></b>',
      title: 'Custom Action',
      result: () => console.log('YOLO')
    },
    {
      name: 'image',
      result: () => {
        const url = window.prompt('Enter the image URL')
        if (url) exec('insertImage', url)
      }
    },
    {
      name: 'link',
      result: () => {
        const url = window.prompt('Enter the link URL')
        if (url) exec('createLink', url)
      }
    }
  ],
  //编辑器的自定义样式
  classes: {
    actionbar: 'pell-actionbar-custom-name',
    button: 'pell-button-custom-name',
    content: 'pell-content-custom-name',
    selected: 'pell-button-selected-custom-name'
  }
})

//默认文本
editor.content.innerHTML = '<b><u><i>Initial content!</i></u></b>'
Pell 实现的东西很简单,原理也不是很难,有时候我们有想法就应该去做,即使是 demo 或许也能够成功哦。

作者

Jared Reich 是一位来自加拿大阿尔伯塔的开发工程师
twitter:https://twitter.com/_jaredreich
今日推荐英文原文:《Things to do After Installing Ubuntu 18.04》作者:
原文链接:https://itsfoss.com/things-to-do-after-installing-ubuntu-18-04/
推荐理由:今天跟 Ubuntu 18.04 LTS的新闻很多,整个社区都很热闹,昨天更跟大家推送了关于 Ubuntu 18.04 你需要知道的事情,今天下载安装 Ubuntu 后,请看这篇《安装完 Ubuntu 18.04 后应该做的事情》,帮助你获得最佳的使用体验。
Things to do After Installing Ubuntu 18.04
If you opted to install Ubuntu 18.04, I have listed out a few recommended steps that you can follow to get started with it.

I should mention that the list of things to do after installing Ubuntu 18.04 depends a lot on you and your interests and needs. If you are a programmer, you’ll focus on installing programming tools. If you are a graphic designer, you’ll focus on installing graphics tools.
Still, there are a few things that should be applicable to most Ubuntu users. This list is composed of those things plus a few of my of my favorites.
Also, this list is for the default GNOME desktop. If you are using some other flavor like Kubuntu, Lubuntu etc then the GNOME-specific stuff won’t be applicable to your system.
You don’t have to follow each and every point on the list blindly. You should see if the recommended action suits your requirements or not.
With that said, let’s get started with this list of things to do after installing Ubuntu 18.04.
1. Update the system
This is the first thing you should do after installing Ubuntu. Update the system without fail. It may sound strange because you just installed a fresh OS but still, you must check for the updates.
In my experience, if you don’t update the system right after installing Ubuntu, you might face issues while trying to install a new program.
To update Ubuntu 18.04, press Super Key (Windows Key) to launch the Activity Overview and look for Software Updater. Run it to check for updates.

Alternatively, you can use these famous commands in the terminal ( Use Ctrl+Alt+T):
sudo apt update && sudo apt upgrade2. Enable additional repositories for more software
Ubuntu has several repositories from where it provides software for your system. These repositories are:
- Main – Free and open-source software supported by Ubuntu team
- Universe – Free and open-source software maintained by the community
- Restricted – Proprietary drivers for devices.
- Multiverse – Software restricted by copyright or legal issues.
- Canonical Partners – Software packaged by Ubuntu for their partners
Enabling all these repositories will give you access to more software and proprietary drivers.
Go to Activity Overview by pressing Super Key (Windows key), and search for Software & Updates:

Under the Ubuntu Software tab, make sure you have checked all of the Main, Universe, Restricted and Multiverse repository checked.

Now move to the Other Software tab, check the option of Canonical Partners.

You’ll have to enter your password in order to update the software sources. Once it completes, you’ll find more applications to install in the Software Center.
3. Install media codecs
In order to play media files like MP#, MPEG4, AVI etc, you’ll need to install media codecs. Ubuntu has them in their repository but doesn’t install it by default because of copyright issues in various countries.
As an individual, you can install these media codecs easily using the Ubuntu Restricted Extra package. Click on the link below to install it from the Software Center.
Install Ubuntu Restricted Extras
Or alternatively, use the command below to install it:
sudo apt install ubuntu-restricted-extras4. Install software from the Software Center
Now that you have setup the repositories and installed the codecs, it is time to get software. If you are absolutely new to Ubuntu, please follow this guide to installing software in Ubuntu.
There are several ways to install software. The most convenient way is to use the Software Center that has thousands of software available in various categories. You can install them in a few clicks from the software center.

It depends on you what kind of software you would like to install. I’ll suggest some of my favorites here.
- VLC – media player for videos
- GIMP – Photoshop alternative for Linux
- Pinta – Paint alternative in Linux
- Calibre – eBook management tool
- Chromium – Open Source web browser
- Kazam – Screen recorder tool
- Gdebi – Lightweight package installer for .deb packages
- Spotify – For streaming music
- Skype – For video messaging
- Kdenlive – Video editor for Linux
- Atom – Code editor for programming
You may also refer to this list of must-have Linux applications for more software recommendations.
5. Install software from the Web
Though Ubuntu has thousands of applications in the software center, you may not find some of your favorite applications despite the fact that they support Linux.
Many software vendors provide ready to install .deb packages. You can download these .deb files from their website and install it by double-clicking on it.
Google Chrome is one such software that you can download from the web and install it.
6. Opt out of data collection in Ubuntu 18.04 (optional)
Ubuntu 18.04 collects some harmless statistics about your system hardware and your system installation preference. It also collects crash reports.
You’ll be given the option to not send this data to Ubuntu servers when you log in to Ubuntu 18.04 for the first time.

If you miss it that time, you can disable it by going to System Settings -> Privacy and then set the Problem Reporting to Manual.

7. Customize the GNOME desktop (Dock, themes, extensions and more)
The GNOME desktop looks good in Ubuntu 18.04 but doesn’t mean you cannot change it.
You can do a few visual changes from the System Settings. You can change the wallpaper of the desktop and the lock screen, you can change the position of the dock (launcher on the left side), change power settings, Bluetooth etc. In short, you can find many settings that you can change as per your need.

Changing themes and icons are the major way to change the looks of your system. I advise going through the list of best GNOME themes and icons for Ubuntu. Once you have found the theme and icon of your choice, you can use them with GNOME Tweaks tool.
You can install GNOME Tweaks via the Software Center or you can use the command below to install it:
sudo apt install gnome-tweak-toolOnce it is installed, you can easily install new themes and icons.

You should also have a look at use GNOME extensions to further enhance the looks and capabilities of your system. I made this video about using GNOME extensions in 17.10 and you can follow the same for Ubuntu 18.04.
If you are wondering which extension to use, do take a look at this list of best GNOME extensions.
I also recommend reading this article on GNOME customization in Ubuntu so that you can know the GNOME desktop in detail.
8. Prolong your battery and prevent overheating
Let’s move on to prevent overheating in Linux laptops. TLP is a wonderful tool that controls CPU temperature and extends your laptops’ battery life in the long run.
Make sure that you haven’t installed any other power saving application such as Laptop Mode Tools. You can install it using the command below in a terminal:
sudo apt install tlp tlp-rdwOnce installed, run the command below to start it:
sudo tlp start9. Save your eyes with Nightlight
Nightlight is my favorite feature in GNOME desktop. Keeping your eyes safe at night from the computer screen is very important. Reducing blue light helps reducing eye strain at night.

GNOME provides a built-in Night Light option, which you can activate in the System Settings.
Just go to System Settings-> Devices-> Displays and turn on the Night Light option.

9. Disable automatic suspend for laptops
Ubuntu 18.04 comes with a new automatic suspend feature for laptops. If the system is running on battery and is inactive for 20 minutes, it will go in suspend mode.
I understand that the intention is to save battery life but it is an inconvenience as well. You can’t keep the power plugged in all the time because it’s not good for the battery life. And you may need the system to be running even when you are not using it.
Thankfully, you can change this behavior. Go to System Settings -> Power. Under Suspend & Power Button section, either turn off the Automatic Suspend option or extend its time period.

You can also change the screen dimming behavior in here.
10. System cleaning
I have written in detail about how to clean up your Ubuntu system. I recommend reading that article to know various ways to keep your system free of junk.
Normally, you can use this little command to free up space from your system:
sudo apt autoremoveIt’s a good idea to run this command every once a while. If you don’t like the command line, you can use a GUI tool like Stacer or Bleach Bit.
11. Going back to Unity or Vanilla GNOME (not recommended)
If you have been using Unity or GNOME in the past, you may not like the new customized GNOME desktop in Ubuntu 18.04. Ubuntu has customized GNOME so that it resembles Unity but at the end of the day, it is neither completely Unity nor completely GNOME.
So if you are a hardcore Unity or GNOMEfan, you may want to use your favorite desktop in its ‘real’ form. I wouldn’t recommend but if you insist here are some tutorials for you:
12. Can’t log in to Ubuntu 18.04 after incorrect password? Here’s a workaround
I noticed a little bug in Ubuntu 18.04 while trying to change the desktop session to Ubuntu Community theme. It seems if you try to change the sessions at the login screen, it rejects your password first and at the second attempt, the login gets stuck. You can wait for 5-10 minutes to get it back or force power it off.
The workaround here is that after it displays the incorrect password message, click Cancel, then click your name, then enter your password again.
13. Experience the Community theme (optional)
Ubuntu 18.04 was supposed to have a dashing new theme developed by the community. The theme could not be completed so it could not become the default look of Bionic Beaver release. I am guessing that it will be the default theme in Ubuntu 18.10.

You can try out the aesthetic theme even today. Installing Ubuntu Community Theme is very easy. Just look for it in the software center, install it, restart your system and then at the login choose the Communitheme session.
14. Get Windows 10 in Virtual Box (if you need it)
In a situation where you must use Windows for some reasons, you can install Windows in virtual box inside Linux. It will run as a regular Ubuntu application.
It’s not the best way but it still gives you an option. You can also use WINE to run Windows software on Linux. In both cases, I suggest trying the alternative native Linux application first before jumping to virtual machine or WINE.
What do you do after installing Ubuntu?
Those were my suggestions for getting started with Ubuntu. There are many more tutorials that you can find under Ubuntu 18.04 tag. You may go through them as well to see if there is something useful for you.
Enough from myside. Your turn now. What are the items on your list of things to do after installing Ubuntu 18.04? The comment section is all yours.
每天推荐一个 GitHub 优质开源项目和一篇精选英文科技或编程文章原文,欢迎关注开源日报。交流QQ群:202790710;电报群 https://t.me/OpeningSourceOrg
