每天推荐一个 GitHub 优质开源项目和一篇精选英文科技或编程文章原文,欢迎关注开源日报。交流QQ群:202790710;电报群 https://t.me/OpeningSourceOrg
今日推荐开源项目:《APK传输助手Wifitransfer-master》
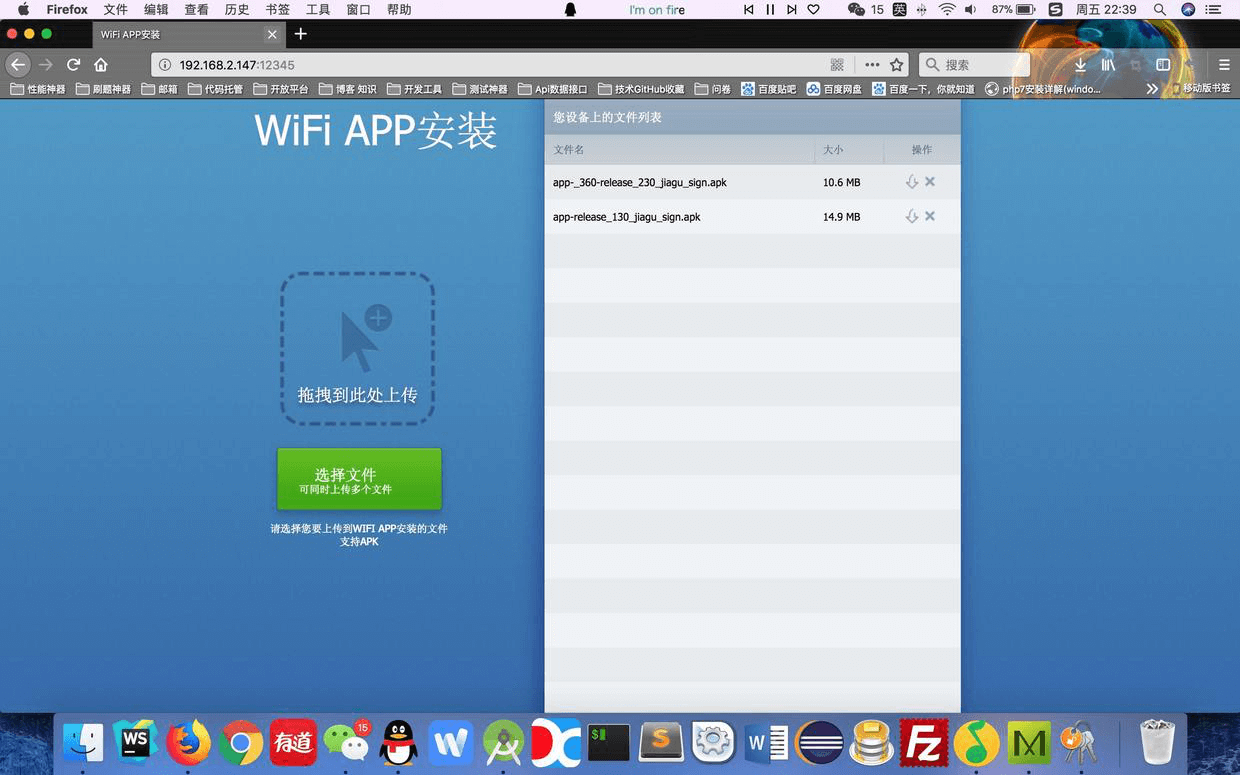
推荐理由:这是一个国人的开源项目,可以方便地通过 WiFi 传输你需要的 apk Android 安装程序包。
![]()
Wifitransfer-master 是什么:
在网页上通过 WIFI 传输数据提交APK到手机上,然后手机端实现对APK的安装和卸载。
为什么使用 Wifitransfer-master:
在缺少数据线(如数据线坏了丢了、互相借用数据线发现接口对不上等等)的情况下进行手机和电脑间的APK传输很麻烦,但如果靠 wifi 在电脑和手机间传输APK就很方便。
发展路程( Wifitransfer-master 与 wifi 传书不得不说的故事):
作者在有这个想法后,发现与另一个网友在博客中实现的功能十分相似( wifi 传书),尤其是Server模块和网页端都已在 wifi 传书中完成。作者就在克隆的基础上做了修改,80%用的是 wifi 传书的东西,但将只能传文档格式改成了只能传APK格式文件,并增加了获取上传文件大小的功能,还改了手机端的显示的样式。
Wifi传书简介:
参照了《多看》的 wifi 传书功能
- 手机端的 HttpServer 采用开源项目 AndroidAsync 实现的。
- 网页端采用 jQuery 实现,文件上传采用 Upload5 (HTML5浏览器)和 js (非 HTML5 浏览器,如 IE7/IE8/IE9 )
使用说明:
- 打开 APP ,点击界面右下角 WIFI 图标,开启 WLAN 服务,获取 APP 当前网络的 IP 地址和指定端口号
- 在同一网络下的电脑浏览器上输入给定的地址,得到指定的数据上传页面,点击选择需要上传的文件
- 上传完成之后(即 apk 文件上传到手机指定的目录),手机上会同步显示你刚刚上传的apk ,然后对刚刚上传的 apk 进行分析(获取名字、大小等信息)。
- 检查本地是否已经安装了同包名的app,如果安装了则显示卸载按钮,如果没有就只显示安装按钮
- 点击安装按钮安装,注意适配0,以及点击卸载的时候进行apk的卸载
- 当然,网页端也可以进行apk的卸载和下载等功能
关于 jQuery
一个易于使用的 js 库,能简化包括遍历 HTML 文档与实现动画等诸多过程,并且具有十分不错的兼容性与可扩展性,如果你是一个使用 js 的程序员,使用它想必能提升你的效率
GitHub 链接:https://github.com/jquery/jquery
关于 AndroidAsync
一个低级的网络协议库,封装了常用的异步请求比如获取字符串、获取 JSON 、获取文件等等,支持缓存,还可以创建 web socket ,功能强大易于使用。
链接:https://github.com/koush/AndroidAsync
关于 upload5
一个灵活的 HTML5 /js 库,能够让你同时处理多个文件的上传
链接:https://github.com/looptribe/upload5
关于 Ajaxupload.js
一款使用 jquery 上传文件的 js 插件,没什么可说的,只能应付简单的情景(也许?),当你使用的不是 HTML5 浏览器时的替代品(此项目中)
链接:https://gist.github.com/harpreetsi/3369391
作者相关
穆仙念 MZCretin

主要专注于Android开发
博客:http://blog.csdn.net/u010998327
Github 个人主页:https://github.com/MZCretin
今日推荐英文原文:《12 Git tips for Git's 12th birthday》作者:
原文链接:https://opensource.com/article/18/4/12-git-tips-gits-12th-birthday
推荐理由:你知道吗? Git 已经 12 岁了,而且,今天就是它 12岁的生日,作为一个程序员每天都打交道的大名鼎鼎的软件,这篇文章精挑细选了12个需要值得提醒的 tips,一起来学习或者复习一下吧。
12 Git tips for Git's 12th birthday

Git, the distributed revision-control system that's become the default tool for source code control in the open source world, turns 12 on April 7. One of the more frustrating things about using Git is how much you need to know to use it effectively. This can also be one of the more awesome things about using Git, because there's nothing quite like discovering a new tip or trick that can streamline or improve your workflow.
In honor of Git's 12th birthday, here are 12 tips and tricks to make your Git experience more useful and powerful, starting with some basics you might have overlooked and scaling up to some real power-user tricks!
1. Your ~/.gitconfig file
The first time you tried to use the git command to commit a change to a repository, you might have been greeted with something like this:
Run
git config --global user.email "[email protected]"
git config --global user.name "Your Name"
to set your account's default identity.
What you might not have realized is that those commands are modifying the contents of ~/.gitconfig, which is where Git stores global configuration options. There are a vast array of things you can do via your ~/.gitconfig file, including defining aliases, turning particular command options on (or off!) on a permanent basis, and modifying aspects of how Git works (e.g., which diff algorithm git diff uses or what type of merge strategy is used by default). You can even conditionally include other config files based on the path to a repository! See man git-config for all the details.
2. Your repo's .gitconfig file
In the previous tip, you may have wondered what that --global flag on the git config command was doing. It tells Git to update the "global" configuration, the one found in ~/.gitconfig. Of course, having a global config also implies a local configuration, and sure enough, if you omit the --global flag, git config will instead update the repository-specific configuration, which is stored in .git/config.
Options that are set in the .git/config file will override any setting in the ~/.gitconfig file. So, for example, if you need to use a different email address for a particular repository, you can run git config user.email "[email protected]". Then, any commits in that repository will use your other email address. This can be super useful if you work on open source projects from a work laptop and want them to show up with a personal email address while still using your work email for your main Git configuration.
Pretty much anything you can set in ~/.gitconfig, you can also set in .git/config to make it specific to the given repository. In any of the following tips, when I mention adding something to your ~/.gitconfig, just remember you could also set that option for just one repository by adding it to .git/config instead.
3. Aliases
Aliases are another thing you can put in your ~/.gitconfig. These work just like aliases in the command shell—they set up a new command name that can invoke one or more other commands, often with a particular set of options or flags. They're super useful for longer, more complicated commands you use frequently.
You can define aliases using the git config command—for example, running git config --global --add alias.st status will make running git st do the same thing as running git status—but I find when defining aliases, it's frequently easier to just edit the ~/.gitconfig file directly.
If you choose to go this route, you'll find that the ~/.gitconfig file is an INI file. INI is basically a key-value file format with particular sections. When adding an alias, you'll be changing the [alias] section. For example, to define the same git st alias as above, add this to the file:
st = status
(If there's already an [alias] section, just add the second line to that existing section.)
4. Aliases to shell commands
Aliases aren't limited to just running other Git subcommands—you can also define aliases that run other shell commands. This is a fantastic way to deal with a recurring, infrequent, and complicated task: Once you've figured out how to do it once, preserve the command under an alias. For example, I have a few repositories where I've forked an open source project and made some local modifications that don't need to be contributed back to the project. I want to keep up-to-date with ongoing development work in the project but also maintain my local changes. To accomplish this, I need to periodically merge the changes from the upstream repo into my fork—which I do by using an alias I call upstream-merge. It's defined like this:
upstream-merge
 = !"git fetch origin -v && git fetch upstream -v && git
 merge upstream/master && git push"
The ! at the beginning of the alias definition tells Git to run the command via the shell. This example involves running a number of git commands, but aliases defined in this way can run any shell command.
(Note that if you want to copy my upstream-merge alias, you'll need to make sure you have a Git remote named upstream pointed at the upstream repository you've forked from. You can add this by running git remote add upstream <URL to repo>.)
5. Visualizing the commit graph
If you work on a project with a lot of branching activity, sometimes it can be difficult to get a handle on all the work that's happening and how it's all related. Various GUI tools allow you to get a picture of different branches and commits in what's called the "commit graph." For example, here's a section of one of my repositories visualized with the GitLab commit graph viewer:
gui_graph.png

John Anderson, CC BY
If you're a dedicated command-line user or somebody who finds switching tools to be distracting, it's nice to get a similar view of the commit graph from the command line. That's where the --graph argument to the git log command comes in:
console_graph.png

John Anderson, CC BY
This is the same section of the same repo visualized with the following command:
git
log --graph --pretty=format:'%Cred%h%Creset -%C(yellow)%d%Creset %s
%Cgreen(%cr) %C(bold blue)<%an>%Creset' --abbrev-commit
--date=relative
The --graph option adds the graph to the left side of the log, --abbrev-commit shortens the commit SHAs, --date=relative expresses the dates in relative terms, and the --pretty bit handles all the other custom formatting. I have this aliased to git lg, and it is one of my top 10 most frequently run commands.
6. A nicer force-push
Sometimes, as hard as you try to avoid it, you'll find that you need to run git push --force to overwrite the history on a remote copy of your repository. You may have gotten some feedback that caused you to do an interactive rebase, or you may simply have messed up and want to hide the evidence.
One of the hazards with force pushes happens when somebody else has made changes on top of the same branch in the remote copy of the repository. When you force-push your rewritten history, those commits will be lost. This is where git push --force-with-lease comes in—it will not allow you to force-push if the remote branch has been updated, which will ensure you don't throw away someone else's work.
7. git add -N
Have you ever used git commit -a to stage and commit all your outstanding changes in a single move, only to discover after you've pushed your commit that git commit -a ignores newly added files? You can work around this by using the git add -N (think "notify") to tell Git about newly added files you'd like to be included in commits before you actually commit them for the first time.
8. git add -p
A best practice when using Git is to make sure each commit consists of only a single logical change—whether that's a fix for a bug or a new feature. Sometimes when you're working, however, you'll end up with more than one commit's worth of change in your repository. How can you manage to divide things up so that each commit contains only the appropriate changes? git add --patch to the rescue!
This flag will cause the git add command to look at all the changes in your working copy and, for each one, ask if you'd like to stage it to be committed, skip over it, or defer the decision (as well as a few other more powerful options you can see by selecting ? after running the command). git add -p is a fantastic tool for producing well-structured commits.
9. git checkout -p
Similar to git add -p, the git checkout command will take a --patch or -p option, which will cause it to present each "hunk" of change in your local working copy and allow you to discard it—basically reverting your local working copy to what was there before your change.
This is fantastic when, for example, you've introduced a bunch of debug logging statements while chasing down a bug. After the bug is fixed, you can first use git checkout -p to remove all the new debug logging, then you git add -p to add the bug fix. Nothing is more satisfying than putting together a beautiful, well-structured commit!
10. Rebase with command execution
Some projects have a rule that each commit in the repository must be in a working state—that is, at each commit, it should be possible to compile the code or the test suite should run without failure. This is not too difficult when you're working on a branch over time, but if you end up needing to rebase for whatever reason, it can be a little tedious to step through each rebased commit to make sure you haven't accidentally introduced a break.
Fortunately, git rebase has you covered with the -x or --exec option. git rebase -x <cmd> will run that command after each commit is applied in the rebase. So, for example, if you have a project where npm run tests runs your test suite, git rebase -x npm run tests would run the test suite after each commit was applied during the rebase. This allows you to see if the test suite fails at any of the rebased commits so you can confirm that the test suite is still passing at each commit.
11. Time-based revision references
Many Git subcommands take a revision argument to specify what part of the repository to work on. This can be the SHA1 of a particular commit, a branch name, or even a symbolic name like HEAD (which refers to the most recent commit on the currently checked out branch). In addition to these simple forms, you can also append a specific date or time to mean "this reference, at this time."
This becomes very useful when you're dealing with a newly introduced bug and find yourself saying, "I know this worked yesterday! What changed?" Instead of staring at the output of git log trying to figure out what commit was changed when, you can simply run git diff HEAD@{yesterday}, and see all the changes that have happened since then. This also works with longer time periods (e.g., git diff HEAD@{'2 months ago'}) as well as exact dates (e.g., git diff HEAD@{'2010-01-01 12:00:00'}).
You can also use these date-based revision arguments with any Git subcommand that takes a revision argument. Find full details about which format to use in the man page for gitrevisions.
12. The all-seeing reflog
Have you ever rebased away a commit, then discovered there was something in that commit you wanted to keep? You may have thought that information was lost forever and would need to be recreated. But if you committed it in your local working copy, it was added to the reference log (reflog), and you should still be able to access it.
Running git reflog will show you a list of all the activity for the current branch in your local working copy and also give you the SHA1 of each commit. Once you've found the commit you rebased away, you can run git checkout <SHA1> to check out that commit, copy any information you need, and run git checkout HEAD to return to the most recent commit in the branch.
That's all folks!
Hopefully at least one of these tips has taught you something new about Git, a 12-year-old project that's continuing to innovate and add new features. What's your favorite Git trick?
每天推荐一个 GitHub 优质开源项目和一篇精选英文科技或编程文章原文,欢迎关注开源日报。交流QQ群:202790710;电报群 https://t.me/OpeningSourceOrg
