每天推荐一个 GitHub 优质开源项目和一篇精选英文科技或编程文章原文,欢迎关注开源日报。交流QQ群:202790710;电报群 https://t.me/OpeningSourceOrg
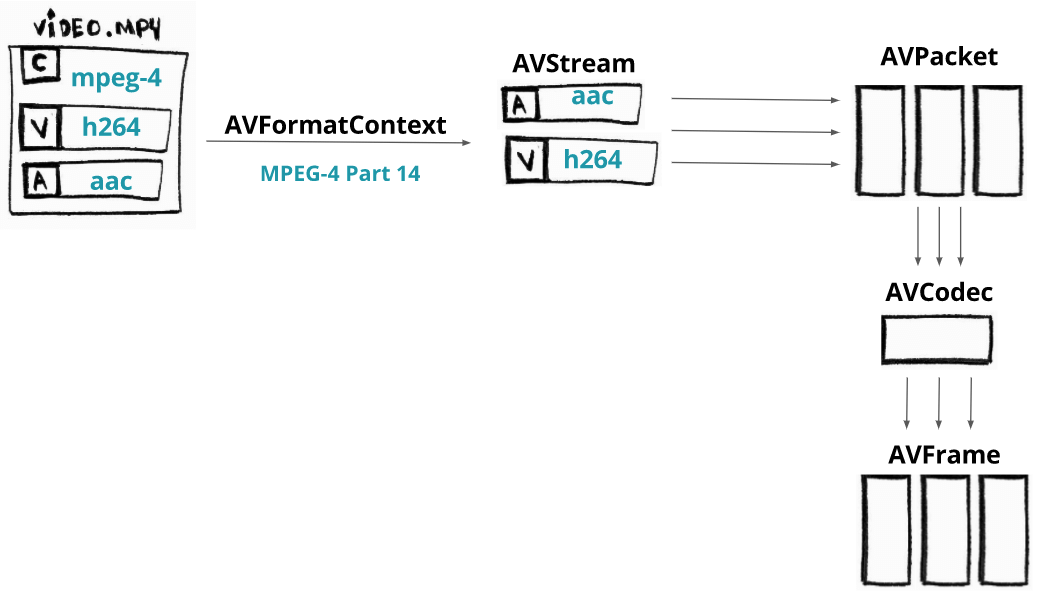
今日推荐开源项目:《一个FFmpeg教程》
推荐理由:FFmpeg 是一个非常优秀的视频处理开源工具,支持的格式和功能,可以说是非常齐全了。
参数基本格式:
作为一个命令行工具, FFmpeg 的参数按照如下格式输入:
ffmpeg {1} {2} -i {3} {4} {5}
1global options 全局选项
2input file options 输入文件设置
3input url 输入文件位置
4output file options 输出文件设置
5output url 输出文件位置
正常使用的话只用记住这个:
ffmpeg -i input.xxx {4} output.xxx
4中内容有很多,可以选择编码器,声音处理,分辨率。帧率等等,常用的有这些:
-s 分辨率(123×456这么写,要无损转换就填原视频分辨率)
-aspect 视频长宽比(4:3, 16:9 or 1.3333, 1.7777)
-an 取消音频
-ac 设置声道数,1就是单声道,2就是立体声,转换单声道的TVrip可以用1(节省一半容量),高品质的DVDrip就可以用2
例如:将一个1980×1080的mp4视频转化成同大小的avi,即输入:
ffmpeg命令行工具指令集合:(来自http://blog.csdn.net/maopig/article/details/6610257)
ffmpeg -i input.mp4 -s 1980×1080 output.avi
基本选项:
-formats 输出所有可用格式
-f fmt 指定格式(音频或视频格式)
-i filename 指定输入文件名,在linux下当然也能指定:0.0(屏幕录制)或摄像头
-y 覆盖已有文件
-t duration 记录时长为t
-fs limit_size 设置文件大小上限
-ss time_off 从指定的时间(s)开始, [-]hh:mm:ss[.xxx]的格式也支持
-itsoffset time_off 设置时间偏移(s),该选项影响所有后面的输入文件。该偏移被加到输入文件的时戳,定义一个正偏移意味着相应的流被延迟了 offset秒。 [-]hh:mm:ss[.xxx]的格式也支持
-title string 标题
-timestamp time 时间戳
-author string 作者
-copyright string 版权信息
-comment string 评论
-album string album名
-v verbose 与log相关的
-target type 设置目标文件类型(“vcd”, “svcd”, “dvd”, “dv”, “dv50”, “pal-vcd”, “ntsc-svcd”, …)
-dframes number 设置要记录的帧数
视频选项:
-b 指定比特率(bits/s),似乎FFmpeg是自动VBR的,指定了就大概是平均比特率
-bitexact 使用标准比特率
-vb 指定视频比特率(bits/s)
-vframes number 设置转换多少桢(frame)的视频
-r rate 帧速率(fps) (可以改,确认非标准桢率会导致音画不同步,所以只能设定为15或者29.97)
-s size 指定分辨率 (320×240)
-aspect aspect 设置视频长宽比(4:3, 16:9 or 1.3333, 1.7777)
-croptop size 设置顶部切除尺寸(in pixels)
-cropbottom size 设置底部切除尺寸(in pixels)
-cropleft size 设置左切除尺寸 (in pixels)
-cropright size 设置右切除尺寸 (in pixels)
-padtop size 设置顶部补齐尺寸(in pixels)
-padbottom size 底补齐(in pixels)
-padleft size 左补齐(in pixels)
-padright size 右补齐(in pixels)
-padcolor color 补齐带颜色(000000-FFFFFF)
-vn 取消视频
-vcodec codec 强制使用codec编解码方式(‘copy’ to copy stream)
-sameq 使用同样视频质量作为源(VBR)
-pass n 选择处理遍数(1或者2)。两遍编码非常有用。第一遍生成统计信息,第二遍生成精确的请求的码率
-passlogfile file 选择两遍的纪录文件名为file
-newvideo 在现在的视频流后面加入新的视频流
高级视频选项:
-pix_fmt format set pixel format, ‘list’ as argument shows all the pixel formats supported
-intra 仅适用帧内编码
-qscale q 以<数值>质量为基础的VBR,取值0.01-255,约小质量越好
-loop_input 设置输入流的循环数(目前只对图像有效)
-loop_output 设置输出视频的循环数,比如输出gif时设为0表示无限循环
-g int 设置图像组大小
-cutoff int 设置截止频率
-qmin int 设定最小质量,与-qmax(设定最大质量)共用,比如-qmin 10 -qmax 31
-qmax int 设定最大质量
-qdiff int 量化标度间最大偏差 (VBR)
-bf int 使用frames B 帧,支持mpeg1,mpeg2,mpeg4
音频选项:
-ab 设置比特率(单位:bit/s,也许老版是kb/s)前面-ac设为立体声时要以一半比特率来设置,比如192kbps的就设成96,转换 默认比特率都较小,要听到较高品质声音的话建议设到160kbps(80)以上。
-aframes number 设置转换多少桢(frame)的音频
-aq quality 设置音频质量 (指定编码)
-ar rate 设置音频采样率 (单位:Hz),PSP只认24000
-ac channels 设置声道数,1就是单声道,2就是立体声,转换单声道的TVrip可以用1(节省一半容量),高品质的DVDrip就可以用2
-an 取消音频
-acodec codec 指定音频编码(‘copy’ to copy stream)
-vol volume 设置录制音量大小(默认为256) <百分比> ,某些DVDrip的AC3轨音量极小,转换时可以用这个提高音量,比如200就是原来的2倍
-newaudio 在现在的音频流后面加入新的音频流
字幕选项:
-sn 取消字幕
-scodec codec 设置字幕编码(‘copy’ to copy stream)
-newsubtitle 在当前字幕后新增
-slang code 设置字幕所用的ISO 639编码(3个字母)
Audio/Video 抓取选项:
-vc channel 设置视频捕获通道(只对DV1394)
-tvstd standard 设置电视标准 NTSC PAL(SECAM)
音频转换:
要得到一个高画质音质低容量的MP4的话,首先画面最好不要用固定比特率,而用VBR参数让程序自己去判断,而音质参数可以在原来的基础上提升一点,听起来要舒服很多,也不会太大(看情况调整 )
转换为flv:
ffmpeg -i test.mp3 -ab 56 -ar 22050 -b 500 -r 15 -s 320×240 test.flv
ffmpeg -i test.wmv -ab 56 -ar 22050 -b 500 -r 15 -s 320×240 test.flv
转换文件格式的同时抓缩微图:
ffmpeg -i “test.avi” -y -f image2 -ss 8 -t 0.001 -s 350×240 ‘test.jpg’
对已有flv抓图:
ffmpeg -i “test.flv” -y -f image2 -ss 8 -t 0.001 -s 350×240 ‘test.jpg’
转换为3gp:
ffmpeg -y -i test.mpeg -bitexact -vcodec h263 -b 128 -r 15 -s 176×144 -acodec aac -ac 2 -ar 22500 -ab 24 -f 3gp test.3gp
ffmpeg -y -i test.mpeg -ac 1 -acodec amr_nb -ar 8000 -s 176×144 -b 128 -r 15 test.3gp
参数解释:
-y(覆盖输出文件,即如果1.***文件已经存在的话,不经提示就覆盖掉了)
-i “1.avi”(输入文件是和ffmpeg在同一目录下的1.avi文件,可以自己加路径,改名字)
-title “Test”(在PSP中显示的影片的标题)
-vcodec xvid(使用XVID编码压缩视频,不能改的)
-s 368×208(输出的分辨率为368×208,注意片源一定要是16:9的不然会变形)
-r 29.97(帧数,一般就用这个吧)
-b 1500(视频数据流量,用-b xxxx的指令则使用固定码率,数字随便改,1500以上没效果;还可以用动态码率如:-qscale 4和-qscale 6,4的质量比6高)
-acodec aac(音频编码用AAC)
-ac 2(声道数1或2)
-ar 24000(声音的采样频率,好像PSP只能支持24000Hz)
-ab 128(音频数据流量,一般选择32、64、96、128)
-vol 200(200%的音量,自己改)
-f psp(输出psp专用格式)
-muxvb 768(好像是给PSP机器识别的码率,一般选择384、512和768,我改成1500,PSP就说文件损坏了)
“test.***”(输出文件名,也可以加路径改文件名)
今日推荐英文原文:《Introducing TensorFlow.js: Machine Learning in Javascript》作者:Josh Gordon / Sara Robinson
原文链接:https://medium.com/tensorflow/introducing-tensorflow-js-machine-learning-in-javascript-bf3eab376db
推荐理由:关注人工智能的同学想必都知道 TensorFlow,然而不一定知道 TensorFlow.js 吧?这是一个可以使用 JavaScript 在你的浏览器运行的人工智能 API,如果你是一个前端开发者,又对机器学习感兴趣,那么这是一个非常棒的学习的开始。
Introducing TensorFlow.js: Machine Learning in Javascript
We’re excited to introduce TensorFlow.js, an open-source library you can use to define, train, and run machine learning models entirely in the browser, using Javascript and a high-level layers API. If you’re a Javascript developer who’s new to ML, TensorFlow.js is a great way to begin learning. Or, if you’re a ML developer who’s new to Javascript, read on to learn more about new opportunities for in-browser ML. In this post, we’ll give you a quick overview of TensorFlow.js, and getting started resources you can use to try it out.
In-Browser ML
Running machine learning programs entirely client-side in the browser unlocks new opportunities, like interactive ML! If you’re watching the livestream for the TensorFlow Developer Summit, during the TensorFlow.js talk you’ll find a demo where @dsmilkov and @nsthorat train a model to control a PAC-MAN game using computer vision and a webcam, entirely in the browser. You can try it out yourself, too, with the link below — and find the source in the examples folder.

If you’d like to try another game, give the Emoji Scavenger Hunt a whirl — this time, from a browser on your mobile phone.

ML running in the browser means that from a user’s perspective, there’s no need to install any libraries or drivers. Just open a webpage, and your program is ready to run. In addition, it’s ready to run with GPU acceleration. TensorFlow.js automatically supports WebGL, and will accelerate your code behind the scenes when a GPU is available. Users may also open your webpage from a mobile device, in which case your model can take advantage of sensor data, say from a gyroscope or accelerometer. Finally, all data stays on the client, making TensorFlow.js useful for low-latency inference, as well as for privacy preserving applications.
What can you do with TensorFlow.js?
If you’re developing with TensorFlow.js, here are three workflows you can consider.
- You can import an existing, pre-trained model for inference. If you have an existing TensorFlow or Keras model you’ve previously trained offline, you can convert into TensorFlow.js format, and load it into the browser for inference.
- You can re-train an imported model. As in the Pac-Man demo above, you can use transfer learning to augment an existing model trained offline using a small amount of data collected in the browser using a technique called Image Retraining. This is one way to train an accurate model quickly, using only a small amount of data.
- Author models directly in browser. You can also use TensorFlow.js to define, train, and run models entirely in the browser using Javascript and a high-level layers API. If you’re familiar with Keras, the high-level layers API should feel familiar.
Let’s see some code
If you like, you can head directly to the samples or tutorials to get started. These show how-to export a model defined in Python for inference in the browser, as well as how to define and train models entirely in Javascript. As a quick preview, here’s a snippet of code that defines a neural network to classify flowers, much like on the getting started guide on TensorFlow.org. Here, we’ll define a model using a stack of layers.
import * as tf from ‘@tensorflow/tfjs’;
const model = tf.sequential();
model.add(tf.layers.dense({inputShape: [4], units: 100}));
model.add(tf.layers.dense({units: 4}));
model.compile({loss: ‘categoricalCrossentropy’, optimizer: ‘sgd’});
The layers API we’re using here supports all of the Keras layers found in the examples directory (including Dense, CNN, LSTM, and so on). We can then train our model using the same Keras-compatible API with a method call:
await model.fit(
  xData, yData, {
    batchSize: batchSize,
    epochs: epochs
});
The model is now ready to use to make predictions:
// Get measurements for a new flower to generate a prediction
// The first argument is the data, and the second is the shape.
const inputData = tf.tensor2d([[4.8, 3.0, 1.4, 0.1]], [1, 4]);

// Get the highest confidence prediction from our model
const result = model.predict(inputData);
const winner = irisClasses[result.argMax().dataSync()[0]];

// Display the winner
console.log(winner);
TensorFlow.js also includes a low-level API (previously deeplearn.js) and support for Eager execution. You can learn more about these by watching the talk at the TensorFlow Developer Summit.
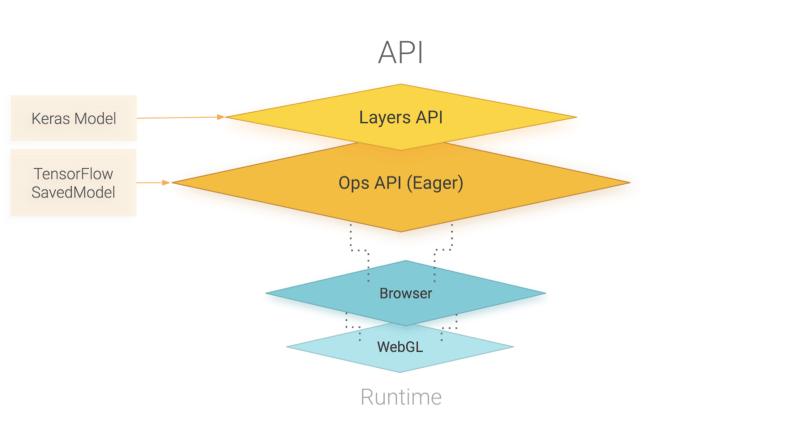
An overview of TensorFlow.js APIs. TensorFlow.js is powered by WebGL and provides a high-level layers API for defining models, and a low-level API for linear algebra and automatic differentiation. TensorFlow.js supports importing TensorFlow SavedModels and Keras models.
How does TensorFlow.js relate to deeplearn.js?
Good question! TensorFlow.js, an ecosystem of JavaScript tools for machine learning, is the successor to deeplearn.js which is now called TensorFlow.js Core. TensorFlow.js also includes a Layers API, which is a higher level library for building machine learning models that uses Core, as well as tools for automatically porting TensorFlow SavedModels and Keras hdf5 models. For answers to more questions like this, check out the FAQ.
每天推荐一个 GitHub 优质开源项目和一篇精选英文科技或编程文章原文,欢迎关注开源日报。交流QQ群:202790710;电报群 https://t.me/OpeningSourceOrg
